
Your toddler keeps climbing out of their crib at 2 a.m., or your guest room feels cramped with a standard bed frame. You need a solution that’s safe, space-saving, and surprisingly simple to build: a floor bed frame. Unlike just plopping a mattress on the floor (which risks mold and poor support), this purpose-built platform sits just 3-6 inches high while providing critical airflow and stability. In this guide, you’ll learn exactly how to construct a sturdy, non-toxic floor bed frame tailored to your space—whether you’re creating a Montessori-friendly toddler sanctuary or a sleek minimalist adult bed. I’ll walk you through proven designs, material hacks, and safety-critical measurements you won’t find in generic tutorials.
Why a Floor Bed Frame Beats a Mattress on the Floor (Safety & Support Explained)
Placing a mattress directly on bare flooring invites hidden dangers: trapped moisture breeds mold under memory foam, and inadequate support causes premature sagging. A true floor bed frame solves both problems. Its elevated platform—typically built with 2×4 lumber and spaced slats—creates essential airflow while distributing weight evenly across the mattress. For toddlers, this design aligns with Montessori principles by enabling safe independence; your child can climb in and out without risky crib escapes. Crucially, the frame’s low height (under 6 inches) minimizes fall impact, but only if built correctly. Unlike store-bought options costing $300+, your DIY version costs under $150 and fits any mattress size from crib to queen.
Critical Safety Gap Measurements for Toddler Bed Rails
When adding railings for young children, precise spacing prevents life-threatening entrapment. Vertical slats must measure between 2.375 inches and 3.5 inches wide—narrow enough to block a child’s head but wide enough to avoid neck straining. The top rail should sit at least 5 inches above the mattress to discourage climbing. Use a tape measure to verify every gap before assembly; this isn’t a step to eyeball. For infants transitioning from cribs, skip railings entirely during initial adjustment and rely solely on room-proofing (outlets covered, furniture anchored).
How Slatted Bases Prevent Mold vs. Solid Platforms
Solid plywood platforms trap heat and humidity against the mattress base—a recipe for mildew in as little as 30 days. Your frame must use spaced slats (1×4 lumber) for breathability. Install them no more than 3 inches apart to support the mattress edge while allowing air circulation. In humid climates, add 1/8-inch spacers between slats during assembly for extra airflow. Never use particleboard—it swells when exposed to moisture from inevitable nighttime accidents.
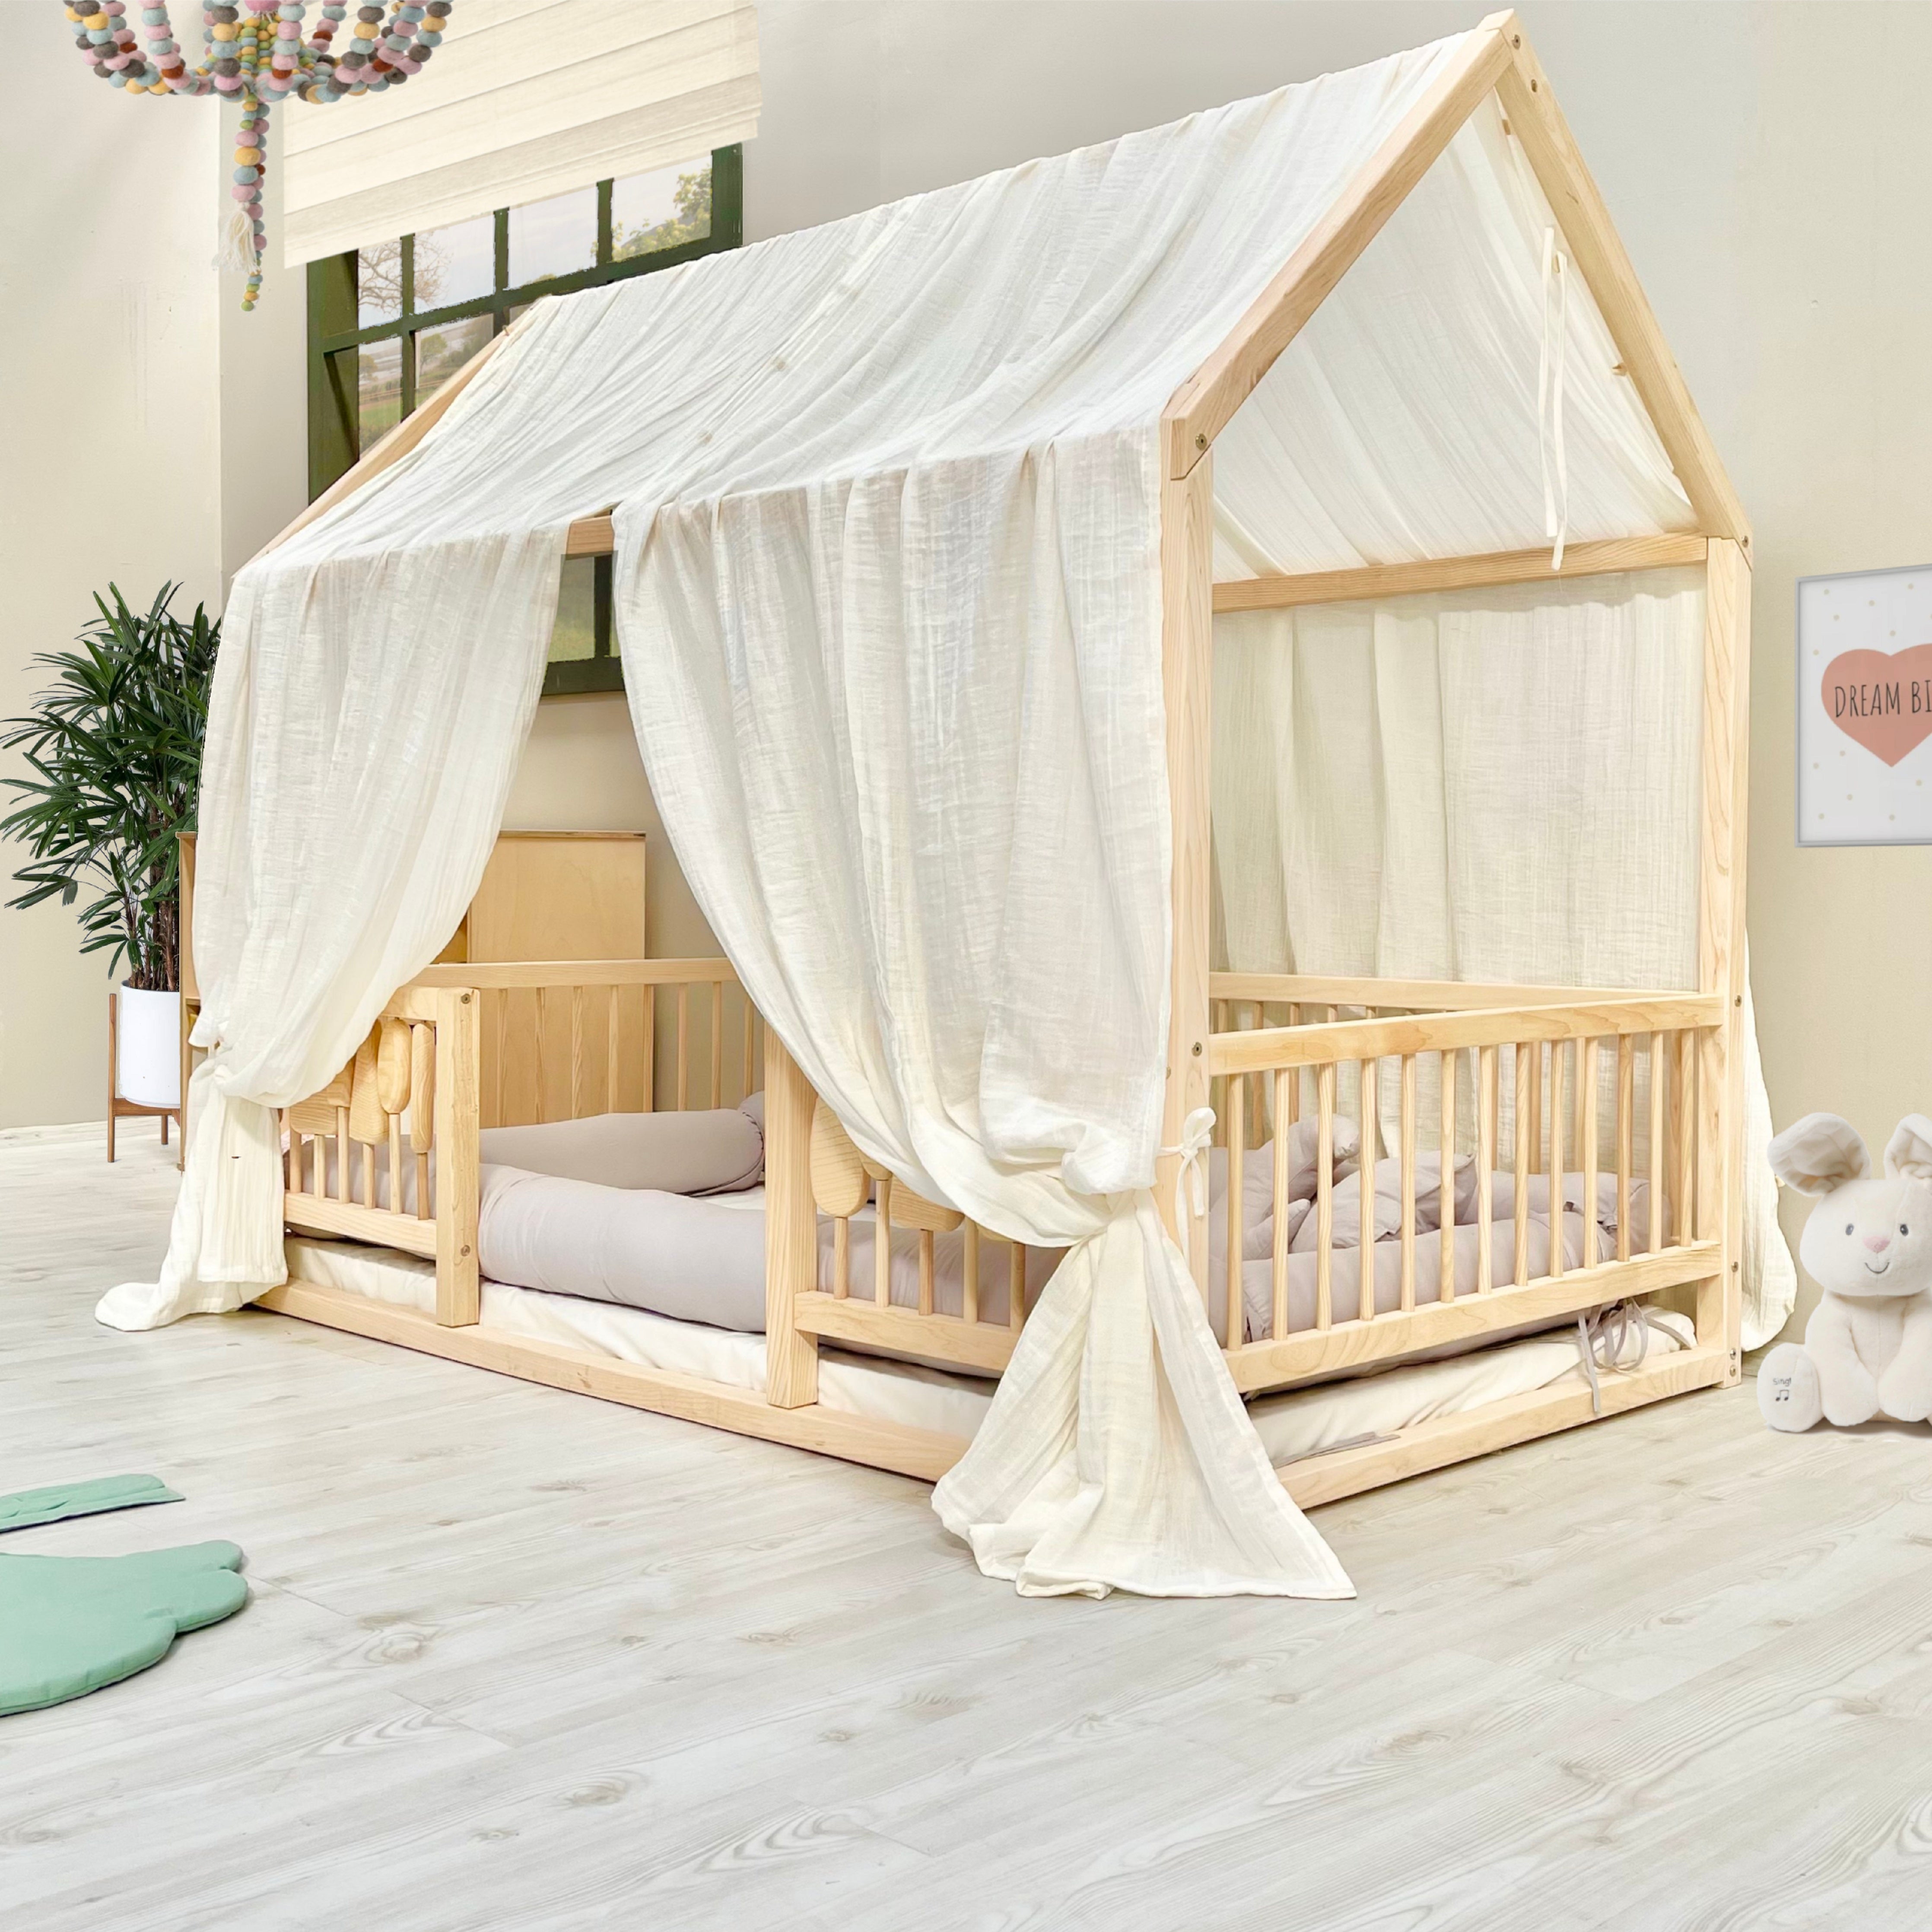
3 Proven Floor Bed Designs: From Montessori House Frames to Minimalist Platforms
Skip generic “styles” lists—these three field-tested designs solve specific problems. Choose based on your skill level and primary need.
Build a Montessori House Frame in 4 Hours (Toddler-Approved)
This canopy-style frame creates a cozy “nest” that comforts anxious sleepers while satisfying Montessori independence goals. Use lightweight 2×2 lumber cut into two A-frame triangles (36″ tall x 40″ wide for twin beds). Attach them to your platform frame 12 inches from each end with 2.5″ pocket screws. Stretch cotton fabric between the peaks for a tent-like effect—no sewing required. Pro tip: Add removable clip-on fairy lights inside the frame; children feel secure with soft illumination but won’t pull on cords.
The $100 Minimalist Twin Platform for Adults
Forget flimsy IKEA bases. This adult-sized platform uses 2×6 lumber for industrial strength at half the cost. Cut two side rails to 77 inches and head/footboards to 40 inches (for a standard 38″x75″ twin mattress). Assemble with pocket holes and wood glue, then add three 2×4 crossbeams spaced 18 inches apart. Top with 1×4 slats 2.5 inches apart—this wider spacing saves 30% on lumber without sacrificing support. Stain with water-based polyurethane for a warm, modern look that takes 20 minutes to assemble.
Space-Saving Queen Frame for Studio Apartments
Maximize square footage in tight spaces with a low-profile queen frame that doubles as storage. Build the base 5 inches high using 2x4s, but extend the headboard to 12 inches tall. Add a hinged plywood lid over the foot third of the frame to create hidden storage for linens. Critical adjustment: For queen mattresses (60″x80″), reduce internal frame dimensions to 59.5″x79.5″ to prevent mattress slippage. Use casters with locking brakes on the base for easy room reconfiguration.
Exact Lumber Cuts & Assembly Sequence for a Wobble-Free Frame

Follow this precise sequence—deviating causes squeaks and instability. All measurements assume a twin mattress (38″x75″).
Cut Lumber to These Critical Dimensions
- Frame rails: (2) 76″ side rails, (2) 39″ head/footboards (cut from 2x4s)
- Cross supports: (3) 35.5″ pieces (2x4s, spaced 18″ apart)
- Slats: (15) 38.5″ pieces (1x4s, sanded smooth)
- Why these numbers? The 1-inch oversize (39″ vs. 38″ mattress) creates a snug fit that prevents mattress shifting. Cross supports stop 2″ from the frame edge to avoid interfering with mattress corners.
Assemble the Frame in 20 Minutes (No Wobble Guaranteed)
- Join rails with pocket screws: Drill two 1.5″ pocket holes per end of head/footboards. Clamp to side rails and drive 2.5″ screws with wood glue. Check for 90-degree angles using a framing square—never skip this.
- Install cross supports: Position 35.5″ pieces 9″ from each end and centered. Attach with 3″ screws through the frame sides. These prevent “twist” when weight is unevenly distributed.
- Add slats: Place 1x4s flat-side down across the frame, spacing with a 2.5″ drill bit as a spacer. Secure with 1.25″ pocket screws from below—never use nails (they loosen over time).
- Final stability test: Stand on the frame near corners. If it flexes more than 1/8 inch, add a fourth cross support midway.
Safety-First Finishing: Non-Toxic Methods That Prevent Splinters
Skip store-bought “child-safe” finishes—they often contain hidden VOCs. Instead, use this battle-tested method:
Sand Like a Pro to Eliminate Hidden Hazards
Start with 100-grit sandpaper on a random orbital sander to remove saw marks, focusing on edges where hands brush the frame. Wipe with a damp cloth, then switch to 220-grit sanding with the wood grain. Pay special attention to slat ends—they must feel silky smooth against bare skin. Finish by hand-sanding all corners into 1/8-inch radius curves using a sanding sponge; sharp edges cause cuts during play.
Apply Zero-VOC Finish in 30 Minutes
Mix equal parts food-grade mineral oil and beeswax in a glass jar. Melt gently in a double boiler, then cool for 5 minutes. Apply with a lint-free cloth in thin coats, waiting 2 hours between coats. Two coats create a water-resistant barrier that won’t peel like polyurethane. Critical: Keep pets/kids away for 24 hours as it cures—the smell attracts chewing.
Fix These 3 DIY Floor Bed Disasters Before They Happen

Learn from others’ costly mistakes. These fixes take minutes but prevent dangerous failures.
Stop Squeaks at the Source (Not With WD-40)
Squeaks mean loose joints—not “settling.” Disassemble the frame and apply thickened epoxy (mix with sawdust) into all screw holes before reinserting screws. This fills voids better than wood glue alone. For instant relief, rub bar soap along rubbing joints—it’s non-toxic and silences noise for months.
Prevent Mattress Slippage on Smooth Floors
Rubber drawer liners under frame corners create micro-grips that stop sliding. Cut pieces 1″ smaller than the frame base to hide them. Never use double-sided tape—it leaves residue and fails in humidity.
Eliminate Rail Instability With Hidden Bracing
Wobbly rails cause falls. Reinforce with 1/4″ steel plates screwed diagonally between rails and the platform (hidden underneath). Drill countersunk holes so screws sit below the wood surface. Test by pushing hard on the rail—you shouldn’t see movement.
Final Note: Your completed floor bed frame should pass three safety tests before use: (1) No wobble when rocked side-to-side, (2) All edges pass the “cheek test” (no scratchiness when rubbed against skin), and (3) Slats support 50 lbs of weight without flexing more than 1/2 inch. For toddlers, perform monthly stability checks—overtightening screws causes wood splitting, so snug is sufficient. Now slide in that mattress, and enjoy a safer, more spacious room built exactly to your standards. Measure twice, cut once, and sleep soundly knowing your DIY creation supports years of restful nights.


