
Your bedroom deserves a centerpiece that combines minimalist elegance with grounded comfort. A cloud bed frame—characterized by its low-profile, floor-hugging design—creates that serene, modern aesthetic that makes your mattress appear to float effortlessly above the ground. Unlike traditional bed frames that elevate your sleeping surface, this contemporary platform sits just inches from the floor, delivering that coveted “cloud-like” appearance while providing exceptional support. If you’ve ever wondered how to make a cloud bed frame that transforms your bedroom into a tranquil retreat, this guide delivers every detail you need to build a sturdy, stylish platform bed from scratch. You’ll save hundreds compared to store-bought versions while creating a custom piece perfectly tailored to your space and mattress.
Essential Tools and Materials Checklist for Your Cloud Bed Frame
Before you begin cutting wood, gather these specific tools and materials to ensure your cloud bed frame project runs smoothly. Having everything ready prevents mid-build frustration and keeps your momentum going.
Must-Have Tools:
– Precision Cutting Tools: A circular saw for straight cuts plus a jigsaw for any curved elements (though most cloud beds use straight lines)
– Pocket Hole System: A Kreg Jig (model K4 or K5) is essential for creating strong, hidden joints that give your bed that clean, professional look
– Clamping System: At least four 24-inch bar clamps plus quick-release F-style clamps to hold pieces securely during assembly
– Measuring Essentials: A 25-foot tape measure, 12-inch speed square, and 4-foot level to guarantee perfect 90-degree angles
– Finishing Equipment: Random orbital sander with 80-220 grit sandpaper and foam brushes for smooth application of finishes
Critical Materials Selection:
For a queen-size cloud bed frame (the most common size), you’ll need:
– Primary Frame: Eight 8-foot 2×6 boards (for a 60″x80″ queen frame with a solid base)
– Platform Support: Twelve 8-foot 1×4 boards (for slats spaced 2.5 inches apart)
– Hardware: 100+ 2.5-inch pocket hole screws, 30+ 1.5-inch wood screws, and quality wood glue
– Finishing Supplies: 1 quart wood stain (your choice), 1 quart polyurethane, wood filler, and pre-stain conditioner if using pine
Pro Tip: Purchase your lumber a week before starting to allow it to acclimate to your home’s humidity—this prevents warping after assembly. Inspect each board carefully for straightness, avoiding any with significant twists or bows.
Accurate Measurements: Cutting Your Cloud Bed Frame to Perfect Dimensions
Skipping precise measurements guarantees a wobbly, uneven bed. Follow these exact steps to cut your materials correctly for a stable cloud bed frame that perfectly accommodates your mattress.
Why Standard Mattress Sizes Require Custom Frame Dimensions
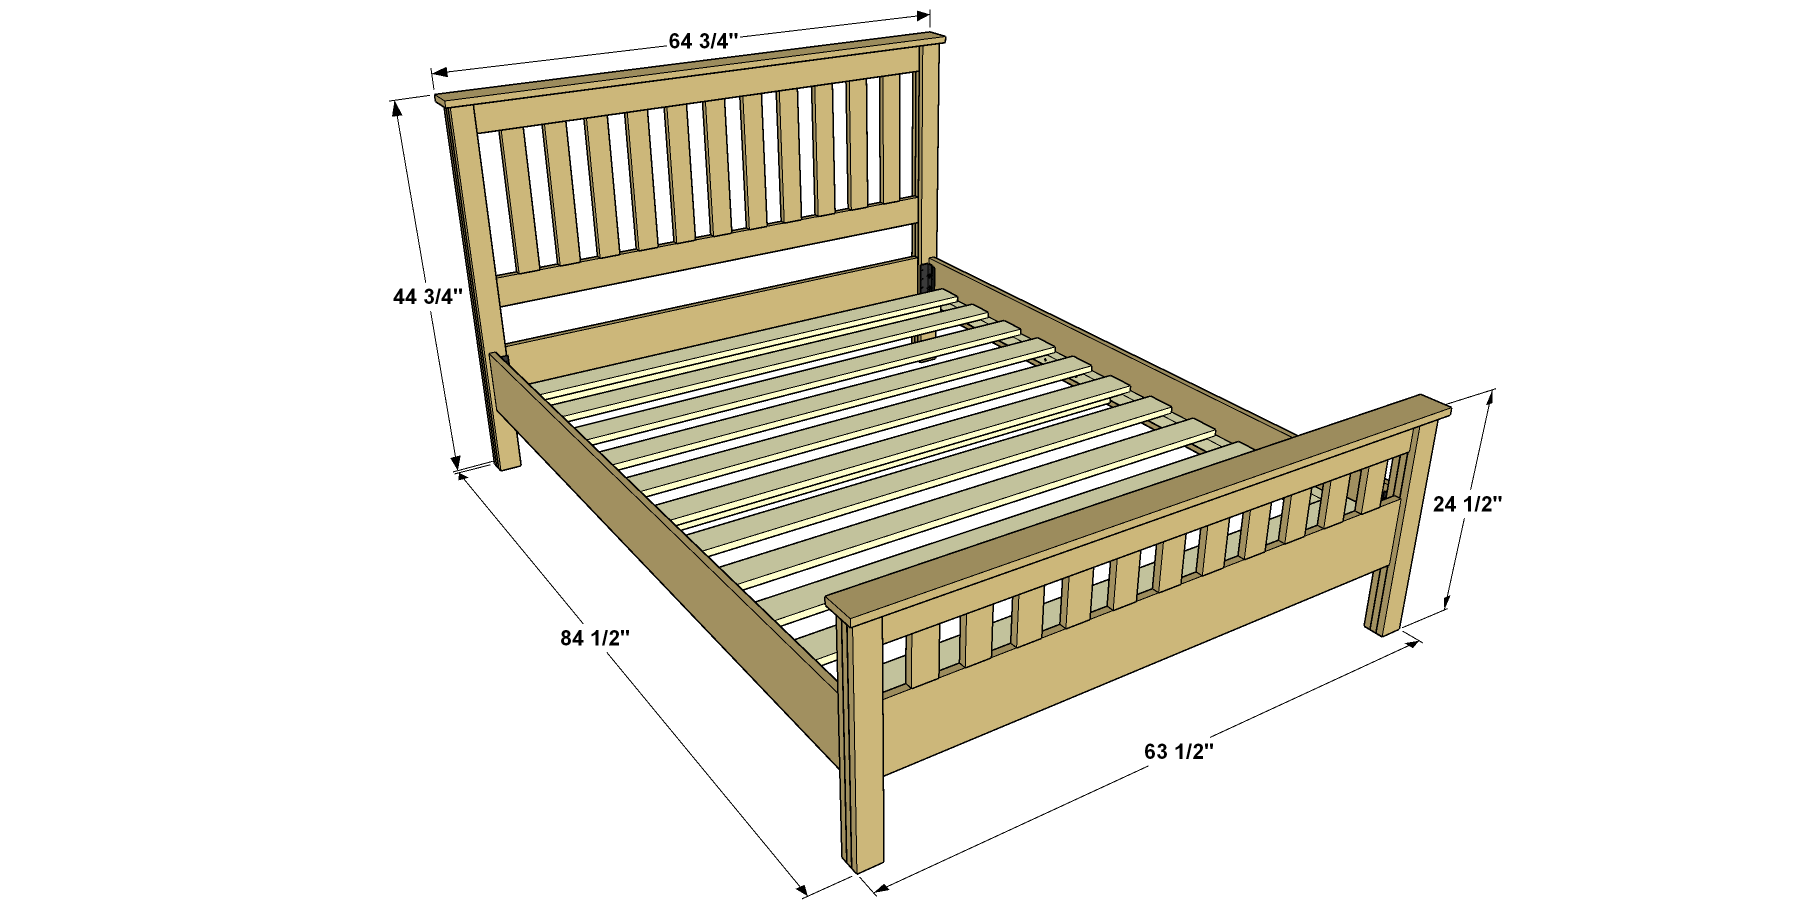
Most beginners make the critical error of building a frame that matches their mattress size exactly. Instead, your cloud bed frame’s internal dimensions should be 1-2 inches larger than your mattress on all sides. For example:
– Queen mattress (60″x80″) requires a 62″x82″ outer frame
– King mattress (76″x80″) needs a 78″x82″ frame
This slight oversizing creates a subtle lip that prevents your mattress from sliding while maintaining that seamless “floating” appearance.
Cutting Sequence for Maximum Efficiency
- Cut your side rails first: Two pieces at 82 inches long from 2×6 lumber
- Cut headboard and footboard: Two pieces at 62 inches long from 2×6 lumber
- Create center support beam: One piece at 82 inches from 2×6 lumber
- Cut legs (if using): Four pieces at 6 inches from 4×4 lumber (for ultra-low profile)
Always cut the longest pieces first to maximize your lumber usage and minimize waste. Mark each cut piece with pencil directly on the wood—labeling “Head,” “Foot,” “Left Side,” and “Right Side” prevents assembly confusion later.
Strong Frame Assembly: Pocket Hole Joinery for a Rock-Solid Base
Your cloud bed frame’s structural integrity depends entirely on proper frame assembly. Here’s how to create joints that withstand nightly use without squeaking or shifting.
Creating Perfect Pocket Holes
Set your Kreg Jig for 1.5-inch material thickness (ideal for 2×6 lumber). Drill three pocket holes spaced evenly along each end of your side rails—never just one or two, as this creates weak points. Apply wood glue to all joining surfaces before clamping; the glue creates a bond stronger than the wood itself, eliminating future squeaks.
Achieving Square Assembly (The Diagonal Test)
After screwing your frame together, measure diagonally from corner to corner. These measurements must be identical—differences mean your frame is out of square, causing uneven mattress support. To correct this, place a clamp across the longer diagonal and gently tighten until measurements equalize. Recheck with your speed square at each corner to confirm perfect 90-degree angles.
Warning: Skipping the diagonal test results in a parallelogram-shaped frame that makes your mattress slide to one side. This common mistake forces complete disassembly—don’t learn this lesson the hard way!
Building a Squeak-Free Platform: Slats vs. Solid Base Options
Your platform design determines mattress comfort and longevity. Here’s how to choose and install the perfect support system for your cloud bed frame.
Solid Plywood Platform Method (Best for Memory Foam Mattresses)
- Cut one sheet of 3/4-inch birch plywood to fit inside your frame (60″x80″ for queen)
- Drill 2-inch diameter ventilation holes every 8 inches across the entire surface
- Attach with 1.5-inch screws every 6 inches along the frame’s inner lip
This method provides uniform support essential for memory foam mattresses, preventing the “hammock effect” that causes premature wear.
Optimized Slatted System (Ideal for Innerspring Mattresses)
- Cut twelve 1×4 slats to 60 inches long
- Space them exactly 2.5 inches apart across the frame
- Attach each slat with two 1.5-inch screws driven through the frame’s inner lip
Critical Tip: Never space slats more than 3 inches apart—this gap causes excessive flexing that shortens your mattress lifespan. For heavier users, reduce spacing to 2 inches.
Professional Finishing: Sanding and Staining Techniques That Impress
The difference between a “DIY project” and “custom furniture” comes down to finishing. Follow this systematic approach for a flawless result.
The 4-Step Sanding Process You Can’t Skip
- Initial Sanding: 80-grit on orbital sander to remove mill marks (15 minutes/frame)
- Intermediate Sanding: 120-grit to smooth rough spots (10 minutes)
- Final Sanding: 220-grit by hand for silky smoothness (20 minutes)
- Dust Removal: Tack cloth wipe-down before any finish application
Skipping grits or rushing this process leaves visible scratches that magnify under stain. Pay special attention to all edges—rounded slightly with sandpaper prevents future splinters.
Stain Application Secrets for Even Color
- Apply pre-stain conditioner if using pine (wait 15 minutes)
- Work in the direction of the wood grain with a clean cloth
- Apply stain liberally, then wipe off excess within 5 minutes
- Let dry 24 hours before applying polyurethane
Pro Tip: Test your stain on scrap wood first—what looks perfect in daylight might appear too dark in your bedroom’s lighting.
Final Assembly and Stability Testing: Your Last Quality Check
Before placing your mattress, conduct these critical tests to ensure your cloud bed frame is safe and stable.
The Wobble Test: Identifying Hidden Weaknesses
Stand at each corner and apply firm downward pressure while rocking the frame side-to-side. Any movement indicates loose joints—disassemble and re-glue problem areas immediately. For queen and king sizes, add two additional center support legs positioned 12 inches from the center beam’s ends.
Weight Distribution Verification
Place 50-pound weights (or friends!) at each corner and the center. The frame should show zero flexing. If you notice bending, add additional cross-bracing between the center beam and frame.
Essential Maintenance for Long-Lasting Cloud Bed Performance
Your newly built cloud bed frame will serve you for decades with minimal care. Every six months, check all screw connections and re-tighten any that have loosened. Place felt pads under legs if you have hardwood floors to prevent scratches during seasonal wood movement. Most importantly, enjoy the serene, grounded sleep experience your custom creation provides—knowing you built this centerpiece yourself for a fraction of retail cost.


