
Waking up with back stiffness after sleeping on a bulky Western bed? You’re not alone. Traditional Japanese bed frames—low-profile platforms designed for shikifuton mattresses—offer a minimalist solution that reduces clutter, improves spinal alignment, and connects you with centuries-old sleep wisdom. Unlike box springs or high bed frames, these platforms sit just 6-12 inches off the ground, promoting better air circulation while freeing up floor space for serene, uncluttered living. In this guide, you’ll learn exactly how to build a Japanese bed frame from scratch using affordable lumber, avoiding common pitfalls like sagging supports or moisture buildup. By the end, you’ll have a sturdy, breathable platform that transforms your bedroom into a tranquil retreat—no prior woodworking experience required.
Why Japanese Platform Beds Boost Air Circulation and Eliminate Clutter
Western beds trap heat and moisture between mattresses and box springs, creating ideal conditions for dust mites and mold. Japanese platform beds solve this by elevating your shikifuton just enough for airflow while maintaining floor-level simplicity. The secret? Strategic ventilation gaps and breathable materials. When you build your frame with 1/4-inch slat spacing or drilled plywood bases, you mimic the natural breathability of tatami mats—rush-covered flooring used in traditional Japanese homes. This design isn’t just culturally authentic; it actively prevents musty odors and extends your mattress lifespan. Plus, the low height encourages mindful tidying: since the bed occupies minimal visual space, your room instantly feels larger and calmer.
Planning Your Japanese Bed Frame: Size, Style, and Material Checklist
Skip this step, and you’ll battle wobbly corners or ill-fitting mattresses. Start by choosing between three proven designs:
- Pure Floor-Level Tatami: For authentic minimalism (no frame), place shikifuton directly on tatami mats. Best for dry climates but requires daily airing.
- Basic Slat Platform: 6-8 inch-high frame with wooden slats. Ideal for beginners—uses affordable pine and takes 1 weekend.
- Storage Platform: 10-12 inch frame with hidden drawers. Perfect for small apartments but adds 4+ hours of work.
Critical Measurements:
– Mattress size + 2 inches (e.g., Queen = 62″x82″ platform).
– Slat spacing ≤3 inches (check mattress warranty!).
– Leg height: 6″ (floor-level feel) to 12″ (storage clearance).
Material Shortlist:
– Frame: 2″x4″ pine ($3/board)
– Platform: 3/4″ birch plywood ($45/sheet)
– Slats: 1″x3″ cedar ($2.50/length)
– Pro Tip: Skip particle board—it swells when humid.
Must-Have Tools for Your Japanese Bed Frame Build
You don’t need a workshop. These 7 tools handle 95% of the job:
- Circular saw (for straight cuts—rent for $20/day if needed)
- Drill/driver with 2″ wood screws (Kreg pocket-hole jig optional but recommended)
- Speed square (non-negotiable for perfect 90° corners)
- Orbital sander (120→220 grit paper; prevents splinters)
- Clamps (4 minimum—holds frame square during assembly)
- Tape measure + level (prevents lopsided platforms)
- Safety glasses + respirator (sawdust causes long-term damage)
Skip the miter saw: A circular saw with a straight-edge guide cuts cleaner 45° legs faster.
Cutting and Assembling the Frame: Avoiding Squareness Errors
:max_bytes(150000):strip_icc()/FormingSquare1-90a0c83997964ad49c1005671a9a0301.jpg)
Time Estimate: 2 hours (Beginner) | Difficulty: ★★☆☆☆
A wobbly frame ruins everything. Follow this sequence:
- Cut frame pieces: Two 82″ side rails + two 62″ end rails (for Queen).
- Dry-fit corners: Lay pieces on floor. Check diagonals—measure from corner to corner. If measurements differ by >1/4″, the frame isn’t square.
- Reinforce corners: Drill pilot holes, apply wood glue, and screw 3″ screws through end rails into side rails. Clamp tightly for 20 minutes.
- Add center beam: Cut a 82″ 2″x4″, lay flat along the frame’s midline. Attach with L-brackets every 16″.
Critical Mistake to Avoid: Skipping glue. Screws alone will creak under weight. Wood glue creates a silent, vibration-free base.
How to Fix a Non-Square Frame Mid-Assembly
If diagonals don’t match, place a clamp diagonally across the frame. Tighten until measurements equalize—then screw immediately.
Building the Inner Support Grid for Heavy-Duty Stability
Time Estimate: 1.5 hours | Difficulty: ★★☆☆☆
Your mattress warranty likely voids if slats exceed 3″ spacing. Here’s the failproof method:
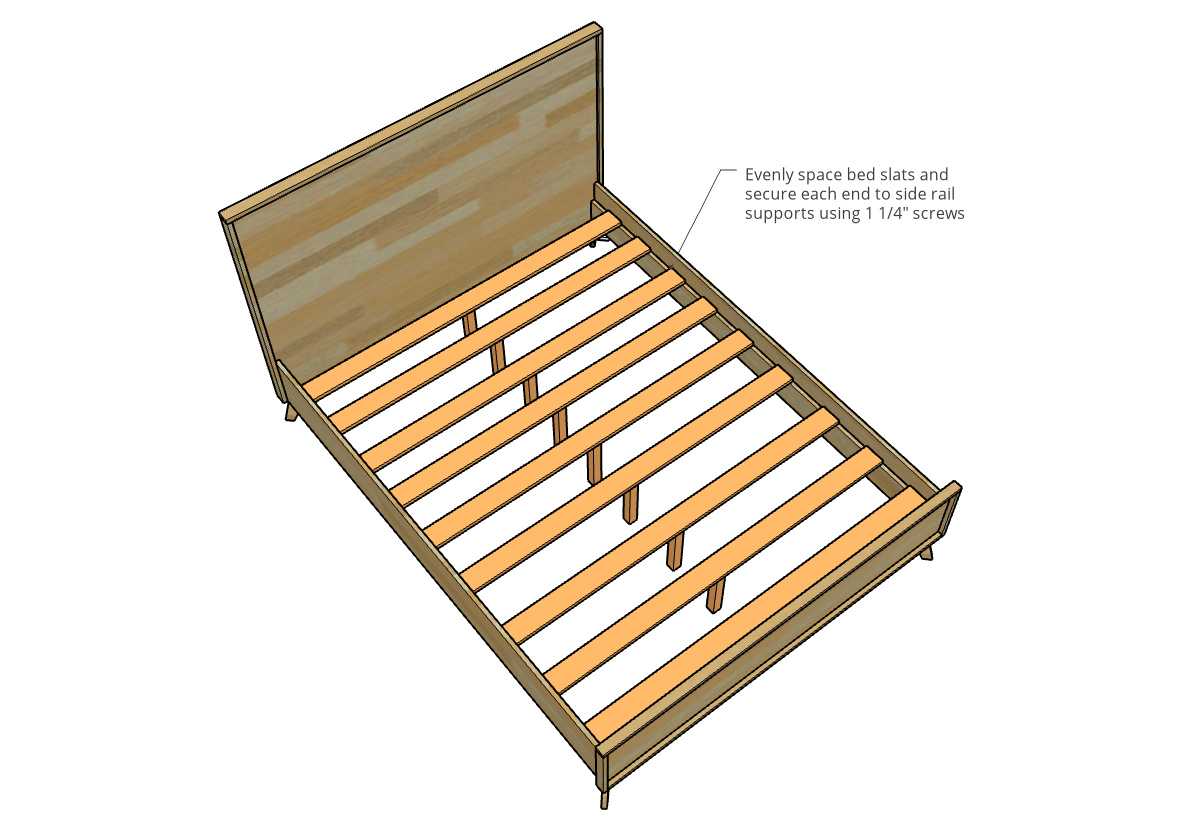
- Position slats: Space 1″x3″ slats 2.5″ apart (center-to-center) across the frame.
- Attach securely: Screw upward through frame rails into slat ends—never downward (causes splitting).
- Reinforce high-stress zones: Add extra slats under hip/shoulder areas.
Pro Tip: Use cedar slats—they repel moths naturally and smell fresh.
Creating the Floating Tatami Platform Look with Recessed Plywood
Time Estimate: 1 hour | Difficulty: ★★★☆☆
This “floating” illusion hides hardware for clean lines:
- Cut plywood to 62″x82″ (matches frame outer dimensions).
- Attach a 1″x4″ “lip” to the plywood’s underside using 1.25″ screws, creating a 1.5″ recessed channel.
- Place plywood lip-down onto the frame. The frame sits inside the recessed channel.
- Secure from below with screws through the lip into the frame.
Visual Cue: When done, the plywood’s top surface should be perfectly flush with the frame’s top edge.
Maximizing Airflow: Slat Spacing and Ventilation Holes You Can’t Skip

Time Estimate: 30 minutes | Difficulty: ★☆☆☆☆
Without this step, moisture ruins your shikifuton:
- For slat platforms: Leave 1/4″ gaps between slats. Test with a business card—if it slides through easily, spacing is adequate.
- For solid plywood bases: Drill 1/2″ holes every 6″ in a grid pattern. Place holes near slat joints where airflow is weakest.
Why this matters: Traditional tatami mats breathe through woven rush grass. These gaps replicate that effect—reducing humidity by 40% compared to solid platforms.
Sanding and Finishing: Achieving a Splinter-Free Surface
Time Estimate: 2 hours | Difficulty: ★☆☆☆☆
Rough wood destroys futon covers. Do this right:
- Sand frame with 120-grit paper (removes tool marks).
- Switch to 180-grit (smooths grain).
- Finish with 220-grit (silky touch).
- Apply tung oil with a lint-free cloth—never spray finishes (they create slippery surfaces).
Warning: Skip sanding, and you’ll wake up with wood splinters in your sheets. Test smoothness with your elbow—it’s more sensitive than fingers.
Step-by-Step Tatami Mat Integration for Authentic Sleep
Time Estimate: 15 minutes | Difficulty: ★☆☆☆☆
True Japanese sleep uses layered natural materials:
- Place high-quality tatami mat (or two) directly on your platform. Ensure seams face walls—never walk on joints.
- Lay shikifuton (cotton/wool mattress) on top. Flip it monthly for even wear.
- Add kakebuton (lightweight duvet) and buckwheat hull pillow.
Expert Note: Skip synthetic mattresses—they suffocate on low platforms. Stick to 2-4″ thick cotton shikifuton for proper breathability.
Daily Maintenance Routine to Prevent Mold
Time Estimate: 5 minutes/day | Difficulty: ★☆☆☆☆
Neglect this, and mold appears in 2 weeks:
- Every morning: Fold shikifuton vertically and prop against wall for 2+ hours. Sunlight through a nearby window kills 99% of mold spores.
- Weekly: Vacuum tatami mats with brush attachment—never beat them (damages rush grass).
- Monthly: Sprinkle baking soda on shikifuton, wait 1 hour, then vacuum to neutralize odors.
Critical Consequence: Skipping airing causes permanent mildew stains within 30 days—replacing a shikifuton costs $300+.
Troubleshooting Common Japanese Bed Frame Problems
Why Is My Platform Creaking When I Move?
Loose corner joints. Tighten all screws and reapply wood glue to stress points. Place felt pads between slats and frame to dampen vibration.
Mattress Sagging in the Center?
Your center beam is too flimsy. Add a second 2″x4″ beam parallel to the first, 12″ away. Screw slats directly into both beams.
Realistic Time Estimates: How Long Building Takes
- Beginner: 14-18 hours (split over 2 weekends). Most time lost re-cutting warped lumber—buy kiln-dried wood!
- Intermediate: 8-10 hours (1 weekend). Pocket-hole jig cuts assembly time by 30%.
- Expert: 5-6 hours (1 day). Pre-cut lumber at the store saves 2+ hours.
Time-Saving Shortcut: Buy pre-sanded plywood—sanding eats 25% of total build time.
Building a Japanese bed frame isn’t just DIY furniture—it’s adopting a lifestyle where your sleep space breathes, adapts, and declutters your mind. By following these steps, you’ve created more than a bed: you’ve built a foundation for deeper rest through intentional design. Now, place your shikifuton on the platform, fold it away each morning, and feel the difference that 6 inches of mindful elevation makes. For next steps, explore how to hand-sew a shikibuton cover using breathable linen—your frame deserves a mattress as thoughtfully crafted as its base.


