
Nothing transforms a bedroom like a custom-built farmhouse bed frame that combines rustic charm with rock-solid construction. Learning how to build a farmhouse bed frame gives you complete control over dimensions, materials, and aesthetics while creating a piece that will last for generations. Whether you’re aiming for Ana White’s beginner-friendly pocket hole design or Ed Hart’s traditional mortise and tenon craftsmanship, this guide delivers precise instructions for building a king-size frame that supports your mattress perfectly without sagging.
This project suits DIYers with basic woodworking skills, though intermediate techniques elevate the final product. Farmhouse beds feature those distinctive “chunky” 4×4 posts and horizontal cross-bracing that create visual interest while providing structural integrity. Let’s dive into the exact process for building your own custom bed frame from scratch.
Cutting Lumber to Exact Bed Frame Dimensions

Precision cutting determines whether your farmhouse bed frame stands square or racks over time. Start with these critical measurements for a standard king bed (76″ x 80″): Cut four 4×4 posts—two at 60″ for the headboard and two at 24″ for the footboard. Your side rails require two 2×6 boards cut to 80″, matching your mattress length exactly. For the headboard frame, cut two 2×4 horizontal rails to 78″ to create that classic overhang.
Pro tip: Always cut posts first since they set your vertical dimensions. Use a sharp 40-tooth carbide blade in your circular saw to prevent tear-out on softwoods like pine. Double-check each measurement with your tape measure before cutting—remember the adage “measure twice, cut once” applies doubly to expensive lumber projects. Sand all cut edges immediately to prevent splinters during assembly.
Assembling a Stable Headboard with Reinforced Cross-Bracing

Your headboard serves as both the visual centerpiece and structural anchor. Begin by attaching the horizontal 2×4 rails between your 60″ 4×4 posts using pocket holes and 2.5″ screws. Position the top rail 4″ below the post top and the bottom rail 4″ above the base. This creates a sturdy frame for your horizontal slats or plywood panel.
For maximum strength, add two horizontal cross-braces between the top and bottom rails at 12″ and 40″ heights. Use 1.5″ pocket hole screws to attach these braces through the headboard posts. Whether you’re installing vertical 1×4 slats or a solid ¾” plywood panel, ensure all components sit flush with the outer edges of your 4×4 posts. This creates that signature farmhouse “chunky” look while preventing future racking.
Constructing a Footboard with Proper Height Proportions
The footboard must balance visually with your headboard while providing structural support. Cut two 4×4 posts to 24″ height for a king bed, maintaining the same width as your headboard posts. Attach top and bottom 2×4 rails using pocket holes, positioning the top rail flush with the post tops.
For beds wider than queen size, add a center vertical support between the top and bottom rails. This prevents flexing and provides additional attachment points for your side rails. Unlike the headboard, footboards typically feature simpler designs—consider adding just one horizontal brace midway up or leaving it open for a cleaner look that won’t obstruct foot traffic.
Building Side Rails with Integrated Slat Support
Your side rails form the bed’s backbone and must withstand daily stress without flexing. Cut two 2×6 boards to your exact mattress length (80″ for king) using your circular saw. Along the inside edge of each rail, attach 1×2 furring strips with 2.5″ screws to create ledges for your slats—position these 1.5″ up from the bottom edge.
Critical detail: The top edge of your side rails should sit 14.5″ above the floor to accommodate standard mattress heights. Before final assembly, test-fit your slats on these ledges to ensure they sit level. For easier disassembly, consider installing bed rail fasteners into the posts and rails now rather than trying to retrofit them later.
Installing Mandatory Center Support for King-Size Beds
Skipping proper center support causes the #1 failure in DIY bed frames: mattress sagging. For king beds, you need three support legs—one at the exact center and two at the one-third and two-thirds points along the 80″ length. Cut a 2×6 center beam to 76″ (matching your mattress width) and attach it perpendicular to your side rails with 3.5″ lag bolts.
Position your 4×4 center legs beneath this beam, ensuring they rest directly on the floor. Use adjustable bed feet on each leg to compensate for uneven floors—a crucial step many beginners overlook. Without this triple-support system, your king mattress will develop a permanent sag within months, regardless of slat quality.
Creating an Optimized Slat System with 3-Inch Spacing
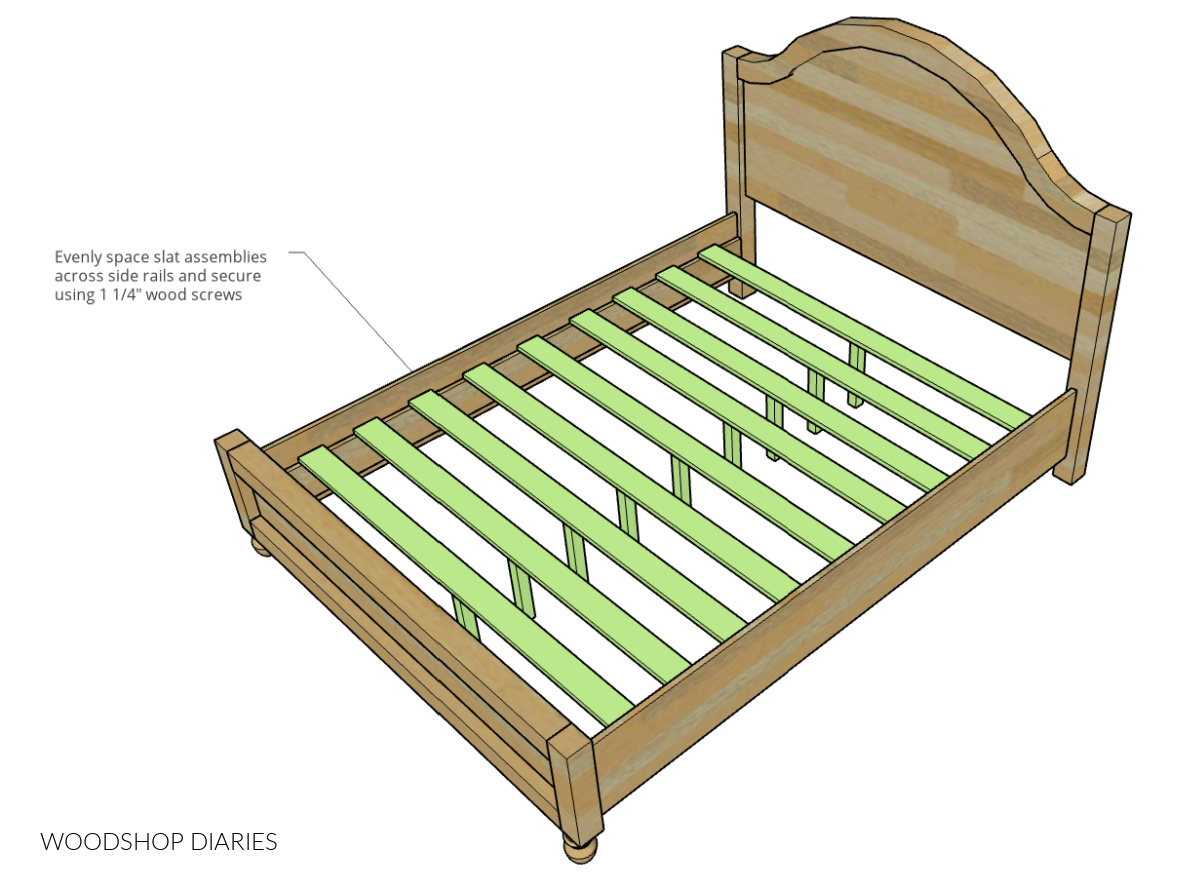
Your slats provide essential mattress support while allowing airflow to prevent mold and mildew. Cut fourteen 1×4 boards to 76″ for a king bed, sanding all edges smooth. Position these slats across your side rail ledges and center beam with exactly 3″ between each—use a spacer block for consistent gaps.
Warning: Never space slats more than 3″ apart for platform beds or 2.5″ for innerspring mattresses. Wider spacing creates pressure points that accelerate mattress wear. Lay slats perpendicular to your side rails and avoid permanently attaching them—this allows for wood movement with seasonal humidity changes. The slight flex in properly spaced slats actually enhances comfort compared to rigid plywood platforms.
Applying Professional Finishes Before Final Assembly
Finishing components before assembly saves hours of frustrating detail work later. Start by sanding all pieces systematically—begin with 80-grit to remove mill marks, progress to 120-grit, then finish with 220-grit for silky-smooth surfaces. Pay special attention to end grain, which absorbs more finish and can create blotchy results.
For that classic farmhouse look, use a two-step process: First apply a high-adhesion primer, then two thin coats of chalk-style paint in your chosen color. If staining, always use pre-stain conditioner on softwoods like pine to prevent blotchiness. Apply finish to all surfaces—including undersides—as moisture penetration causes uneven expansion that leads to warping. Allow 48 hours drying time before assembly.
Avoiding Five Costly Farmhouse Bed Frame Mistakes
Many DIYers repeat these preventable errors that compromise bed frame longevity:
- Insufficient center support – King beds require three legs, not just one
- Skipping pre-drilling – Causes splitting when driving screws near post ends
- Omitting cross-bracing – Leads to bed racking and instability
- Improper slat spacing – Creates pressure points that ruin mattresses
- Assembling before finishing – Makes achieving professional results nearly impossible
Place felt pads between wood-on-wood contact points like slats and ledges to prevent squeaks. When attaching hardware, use the 3-4-5 triangle method to ensure perfect 90° angles—measure 3′ along one rail, 4′ along the adjacent rail, and the diagonal should measure exactly 5′.
Performing Essential Seasonal Maintenance Checks
Your solid wood bed frame requires minimal but crucial maintenance. Every six months, tighten all critical fasteners—especially those connecting side rails to posts and center support legs. Seasonal humidity changes cause wood expansion and contraction that gradually loosens joints. Check for developing gaps at corner connections and address them before they become structural issues.
Rotate your mattress quarterly while inspecting slats for cracks or warping. Replace any damaged slats immediately to maintain even support. Every two years, apply a light coat of furniture wax to moving parts like bed rail fasteners to prevent squeaking. These simple steps ensure your handmade bed remains silent and sturdy for decades.
Building a farmhouse bed frame delivers unmatched satisfaction as you create functional art for your bedroom. By following these precise construction steps—from accurate lumber cutting to proper center support installation—you’ll craft a bed that supports restful sleep for years. Remember that attention to detail in joinery and support systems transforms a simple DIY project into an heirloom-quality piece. With your new skills, you’re ready to build not just a bed, but a centerpiece that anchors your bedroom’s style and comfort for generations to come.


