
Your bedroom deserves a bed frame that perfectly matches your style and space requirements, yet store-bought options often fall short in both aesthetics and budget. Learning how to make a double bed frame puts you in complete control of the design, materials, and dimensions. Whether you’re creating a low-profile platform bed or a traditional frame with slats, this DIY project delivers remarkable value—typically costing 30-50% less than comparable retail options while providing superior customization. The process is accessible to intermediate woodworkers with basic tools, requiring just one weekend to complete a sturdy foundation that will support years of comfortable sleep.
Building your own double bed frame eliminates the frustration of mismatched components and flimsy construction found in many mass-produced models. You’ll gain precise control over height, storage options, and wood selection, ensuring your frame complements your existing bedroom decor perfectly. This comprehensive guide walks you through every critical phase of construction, from selecting the right lumber to applying the perfect finish, so you can create a professional-quality bed frame that becomes the centerpiece of your bedroom.
Essential Tools for Double Bed Frame Construction
Before you cut your first piece of lumber, ensure your workshop is equipped with the right tools for a smooth building experience. Having everything ready prevents mid-project delays and ensures precise, professional results that will keep your bed frame stable and silent for years.
Power Drill and Drill Bits for Secure Assembly
Your power drill is the workhorse of this project—use a cordless drill/driver with adjustable torque settings to prevent stripping screw heads in softwood. Gather these specific bits: a #2 Phillips driver bit for standard wood screws, a countersink bit for clean screw finishes, and drill bits ranging from 1/8″ to 3/16″ for proper pilot holes. Always drill pilot holes before driving screws into end grain to prevent splitting your lumber, especially with 2×4 and 2×6 boards that form your frame’s skeleton.
Must-Have Hand Tools for Precision Measurements
Accurate measurements separate professional-looking projects from amateur attempts. Your tape measure should have both imperial and metric markings for versatility, while a 12-inch combination square helps verify perfect 90-degree angles at every corner. A speed square is indispensable for marking straight cuts on dimensional lumber—place it against your board’s edge and draw along its straight edge for flawless 90-degree lines. For cutting, a circular saw with a sharp 40-tooth carbide blade delivers clean, splinter-free cuts through pine or fir lumber.
Lumber and Hardware Shopping Checklist
Purchase these materials for a standard double/full bed frame (54″ x 75″ mattress):
– Four 8-foot 2x4s (for side rails and support structure)
– Two 8-foot 2x6s (for headboard and footboard rails)
– Eight 8-foot 1x4s (for slats)
– 2-3/4″ exterior-grade wood screws (for structural joints)
– 2-1/2″ wood screws (for slat attachment)
– Wood glue (Titebond II recommended)
– 120- and 220-grit sandpaper
– Your choice of finish (polyurethane, paint, or stain)
Pro Tip: Have your lumber cut at the store to save time and ensure straight, square cuts—most home centers offer one or two free cuts per purchase.
Wood Selection and Fastening Techniques for Maximum Durability

The longevity of your DIY bed frame depends entirely on your material choices and joinery methods. Cutting corners here leads to squeaks, wobbles, and premature failure under nightly use—invest in quality materials and proper techniques from the start.
Choosing the Right Lumber Grade and Species
For the structural frame, select straight, knot-free SPF (spruce-pine-fir) 2x4s with minimal warping—look for boards marked “Select” or “Premium” grade. Avoid pieces with large knots near the ends where screws will penetrate. While Douglas fir offers superior strength, SPF is more affordable and readily available. For visible areas like headboards, consider upgrading to poplar or maple for a smoother finish, but never compromise on structural components—your safety depends on strong, reliable wood.
Optimal Screw Types and Joinery Methods
Replace nails with 3-inch structural wood screws for all critical joints—they provide 3-5 times more holding power and resist withdrawal forces better. Apply wood glue to all mating surfaces before screwing for joints that won’t squeak over time. For corner joints, use the pocket-hole method: drill a 15-degree angled hole with a Kreg Jig, then drive a 2-1/2″ screw through one board into the adjacent piece. This creates an invisible, incredibly strong connection that won’t loosen with mattress movement.
Reinforcement Strategies for Heavy-Duty Support
Double beds support significant weight—add a center support beam every 16 inches for frames wider than 48 inches. Cut a 2×6 to fit snugly between side rails, then secure it with two 3-inch screws at each end plus metal cross-bracing. Install bed frame brackets at all four corners—these heavy-duty L-brackets with 1/4″ bolts prevent racking (lateral movement) that causes squeaks. For extra stability, add a center leg with adjustable feet to compensate for uneven floors.
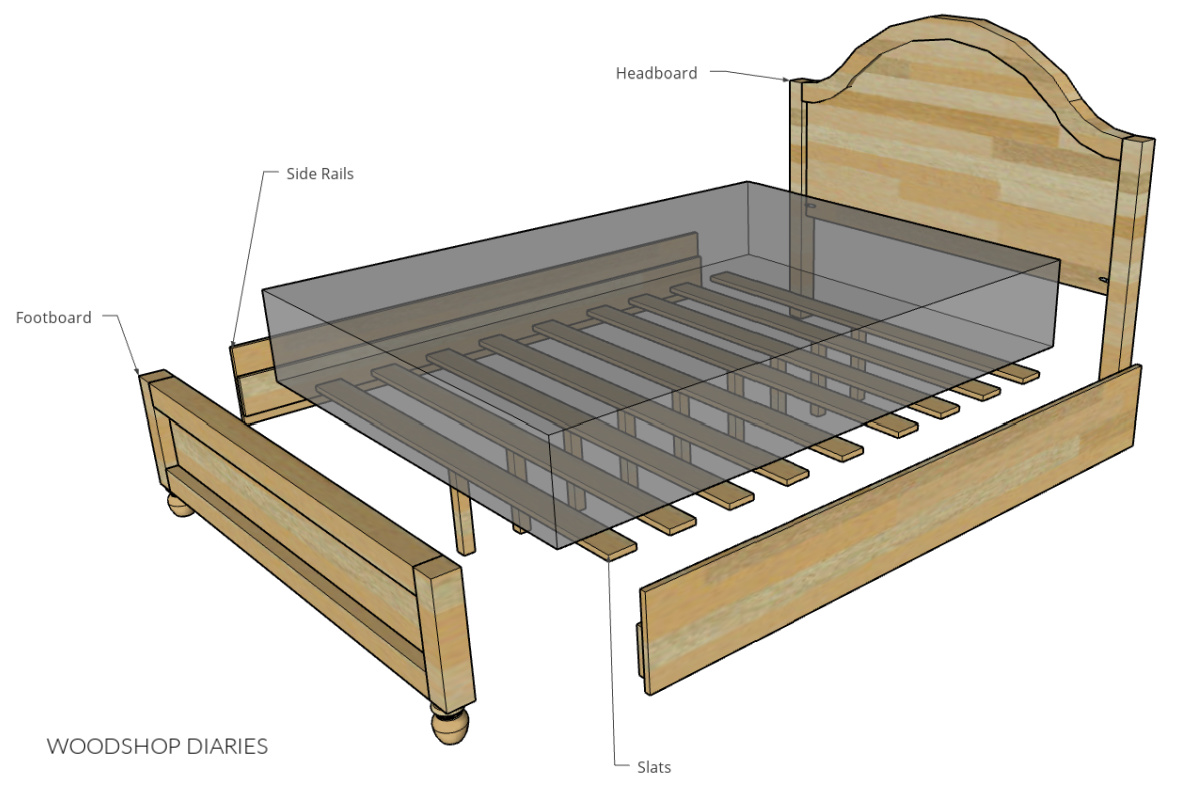
Building a Rock-Solid Double Bed Frame Structure
Your frame’s structural integrity determines whether your bed remains silent and stable for years or develops annoying squeaks that disrupt sleep. Follow these precise steps to create a foundation that won’t twist, warp, or wobble under daily use.
Precise Frame Assembly for Perfect Square Alignment
Cut your 2×6 headboard and footboard rails to 54.5 inches and side rails to 74.5 inches using your speed square for accurate 90-degree cuts. Lay all four pieces flat on your work surface to form a rectangle, then measure diagonally from corner to corner—both measurements must be identical for a perfectly square frame. Clamp the corners securely, then drill two 1/8″ pilot holes through each side rail into the end grain of the head/foot rails before driving 3-inch screws with wood glue.
Installing Critical Center Support Components
Cut a 2×6 center support beam to 74.5 inches and position it exactly midway between head and foot rails. Secure it with two 3-inch screws at each end plus three metal cross-braces underneath for maximum rigidity. For double beds exceeding 60 inches in width, add a second center support beam to prevent sagging. Verify all support components are level with a 4-foot level—even a 1/8-inch discrepancy causes uneven mattress support that accelerates wear.
Creating an Effective Mattress Support System

The quality of your slat system directly impacts mattress longevity and sleeping comfort. Properly spaced slats distribute weight evenly while allowing essential airflow to prevent moisture buildup that degrades mattress materials over time.
Building a Stable Slat Support Structure
Attach 1×2 ledger strips along the inside perimeter of your frame, positioned 3.5 inches from the bottom edge. Space these supports every 16 inches using 2-1/2″ screws through the frame’s outer walls. For the center support beam, install additional ledgers to create a continuous support surface. Sand all ledger edges smooth to prevent snagging mattress fabric during placement and removal.
Installing and Securing Slat Components
Cut 1×4 slats to 54.5 inches (matching your interior frame width), sanding all edges to 45-degree chamfers for safety. Space slats 2-3 inches apart across the entire frame surface, starting from the headboard and working toward the foot. Secure each slat with a single 2-1/2″ screw at both ends and the center support—pre-drill all screw holes to prevent splitting. For added stability, apply a dab of wood glue between slats and ledgers before screwing.
Final Touches for a Professional-Quality Bed Frame
The finishing steps transform your functional frame into a beautiful bedroom centerpiece while protecting your investment from everyday wear and tear. Don’t rush these critical final stages—proper finishing extends your bed’s lifespan by years.
Smoothing and Protecting Your Woodwork
Begin with 120-grit sandpaper to remove tool marks and imperfections, then progress to 220-grit for a silky-smooth surface. Pay special attention to corners and edges where splinters could form. Wipe away all dust with a tack cloth before applying finish—use a water-based polyurethane for durability and quick drying, applying three thin coats with light sanding between layers. Allow 24 hours of drying time before placing your mattress to prevent finish transfer.
Final Assembly and Placement Best Practices
Position your completed frame in the bedroom, then check for level with a spirit level—adjust leg heights if necessary using shims under the frame corners. Place your slats onto the support ledgers, verifying even spacing across the entire surface. When positioning your mattress, lift rather than drag it to prevent damaging your new finish. For optimal support, add a center leg with adjustable feet if your frame exceeds 5 feet in width.
Pro Maintenance Tip: Every six months, tighten all screws and inspect for wear—reapply finish to high-contact areas like corner brackets where metal contacts wood to prevent squeaks before they develop.
Building your own double bed frame delivers unmatched satisfaction and customization while saving significant money compared to retail options. By following these precise construction techniques, you’ve created a foundation that will support restful sleep for years to come. The real beauty of this DIY project lies in its adaptability—modify dimensions for non-standard mattresses, incorporate storage solutions, or experiment with different wood species to match your unique style. Now that you know how to make a double bed frame that meets professional standards, you’ll never settle for poorly constructed store-bought alternatives again.


