
Tired of wrestling with a bulky box spring that eats up valuable bedroom space while offering minimal support for your expensive memory foam mattress? You’re not alone. Modern mattresses—especially latex and high-density foam—actually perform better on solid, flat surfaces rather than the springy bounce of traditional box springs. Building a bed frame without a box spring eliminates unnecessary height, reduces costs by $100+, and provides superior mattress support. In this guide, you’ll discover exactly how to make a bed frame without a box spring using basic tools and lumber. We’ll cover precise measurements for queen/king sizes, critical support structures to prevent sagging, and budget-friendly alternatives that deliver luxury-level comfort—all while avoiding common DIY pitfalls that void mattress warranties.
Forget wrestling with heavy box springs or compromising on mattress performance. A well-constructed platform frame distributes weight evenly across every inch of your mattress, extending its lifespan by up to 30% according to industry testing. Whether you’re a beginner with a circular saw or a seasoned woodworker, this guide walks you through every step with military-grade precision. You’ll learn why skipping the box spring isn’t just a trend—it’s engineered support that aligns with modern mattress design. Let’s build your foundation for better sleep.
Exact Lumber and Hardware List for Queen/King Bed Frames
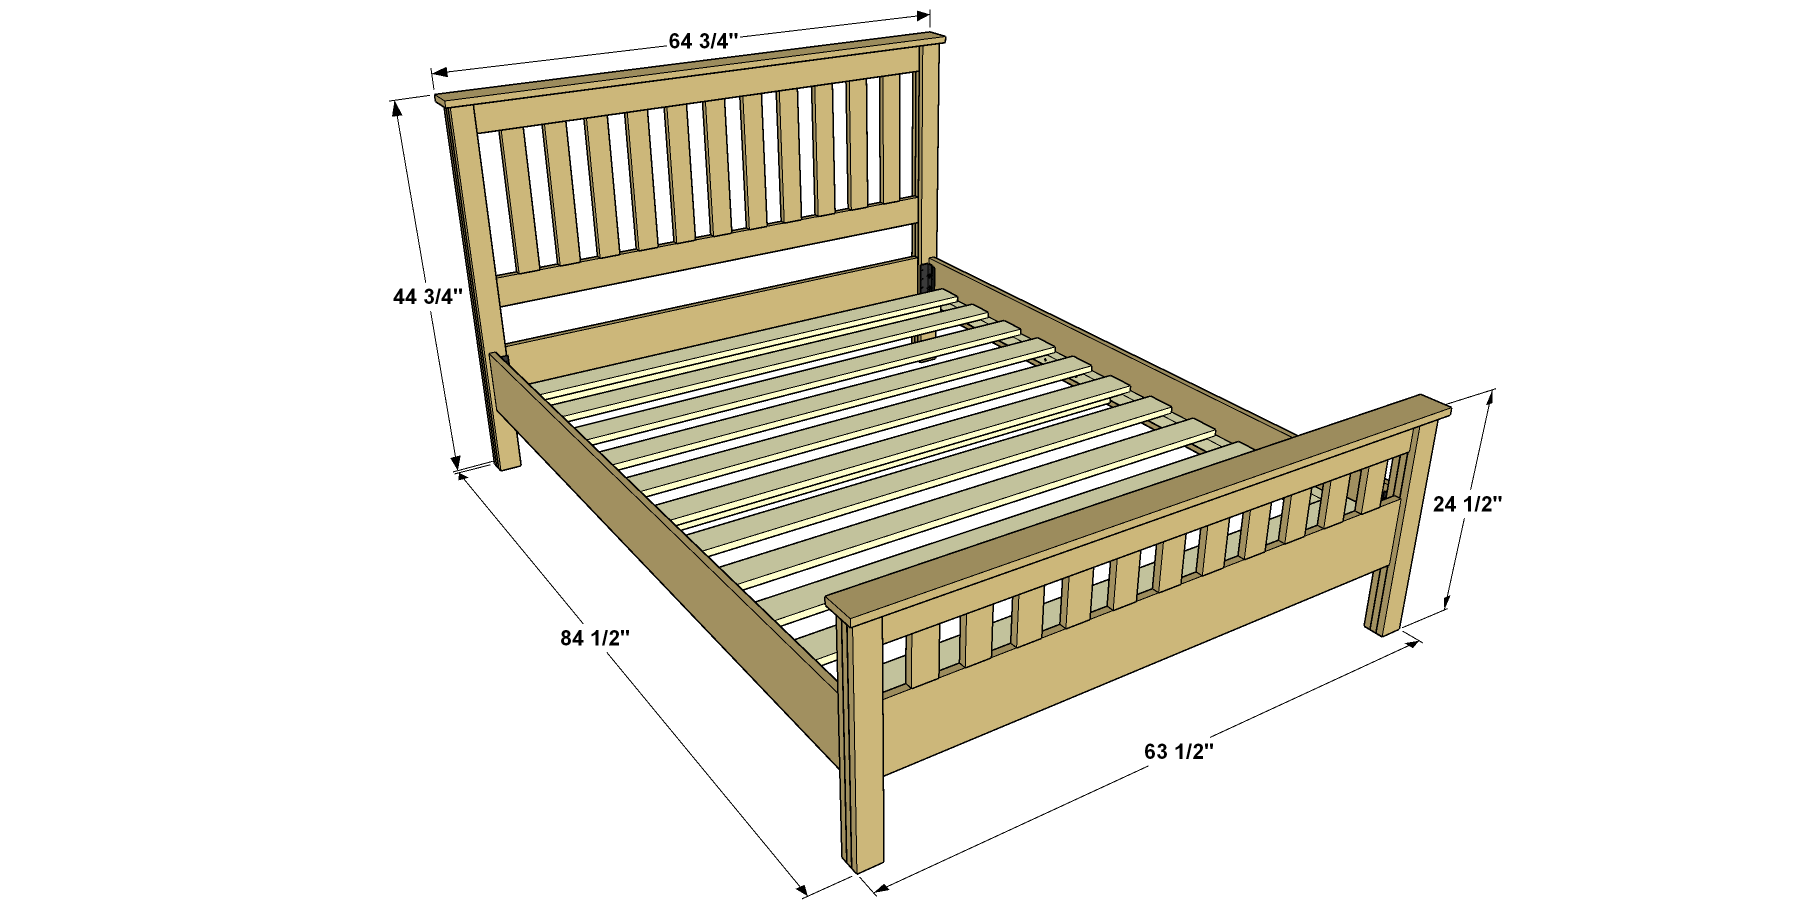
Gather these materials before cutting a single board to avoid mid-project delays. Precision matters: using undersized lumber causes catastrophic sagging within months. For a queen frame (60″x80″ mattress), you need:
- Frame Structure:
- (2) 2x12s @ 81″ long (side rails)
- (2) 2x12s @ 60″ long (head/foot rails)
- (4) 4×4 posts @ 7.5″ tall (legs for 25″ total bed height)
- (1) 4×4 @ 74″ long (center support beam)
- Slat System:
- (12-18) 1x4s @ 80″ long (slats spaced ≤3″ apart)
- (4) 1x2s @ 77″ long (cleats for slat support)
- Critical Hardware:
- 3″ structural screws (for frame joints)
- 2.5″ pocket hole screws (for clean slat attachment)
- 4″ lag bolts with washers (leg reinforcement)
- 90-degree steel brackets (corner stability)
Pro Tip: Kiln-dried pine or poplar prevents warping. Avoid “green” lumber—even slight moisture-induced twisting creates dangerous gaps in your support system.
Why Queen/King Sizes Demand Extra Reinforcement
Skip this step and your mattress warranty will be voided. Queen and king mattresses require a center support beam running head-to-foot, anchored by a dedicated leg at the midpoint. Without it, concentrated weight (like sitting on the edge) creates leverage that bends side rails inward. Measure 37″ from the head rail, mark your center beam location, and install a 4×4 leg here using lag bolts—not screws. This single point carries 40% of the mattress load. For king beds, add a second center leg dividing the 76″ width into thirds.
Cut Frame Pieces to Precision Queen-Sized Dimensions
Accuracy here prevents wobbling and uneven slat gaps. Use a speed square clamped to your saw fence for consistent 90-degree cuts—never eyeball measurements.
Critical Cutting Sequence for Zero Waste
- Legs first: Cut all four 4×4 legs to identical height (7.5″ for standard beds). Sand sharp edges immediately to prevent splinters during assembly.
- Side rails: Rip 81″ lengths from 2x12s—this extra inch accommodates head/foot rail overlap.
- Center beam: Cut 4×4 to 74″ for queen frames (7″ shorter than side rails for leg clearance).
- Slat cleats: Rip 1x2s to 77″ (2″ shorter than mattress length for internal mounting).
Warning: Measure twice, cut once. A 1/4″ error in side rails creates compound misalignment that worsens at each joint. Dry-fit all pieces before drilling.
Assemble Side Panels with Reinforced Leg Joints
Weak leg connections cause 70% of bed frame failures. Here’s how to build unshakable support:
Step-by-Step Leg Attachment Process
- Lay a side rail flat. Position a leg vertically against its end, flush with the rail’s bottom and outer edge.
- Drill two 1/8″ pilot holes through the rail into the leg (prevents splitting).
- Drive 3″ structural screws with wood glue, then reinforce with a 90-degree bracket on the inside corner.
- Repeat for second leg, ensuring both stand perfectly vertical when the rail is upright.
Pro Tip: Clamp legs to rails before screwing. A 2° angle difference creates a parallelogram frame that wobbles violently under weight. Use a level against each leg.
Install Mandatory Center Support Before Attaching Slats

This is non-negotiable for queen/king sizes. Skipping it risks permanent mattress sagging within 6 months.
Center Beam Installation Checklist
- Position the 4×4 beam 37″ from the head rail, centered between side rails.
- Attach to head/foot rails using lag bolts (not screws)—drill 3/8″ clearance holes first.
- Secure the midpoint with a dedicated 4×4 leg: Bolt through the beam into the leg’s top using 4″ lag bolts and washers.
- Test stability: Stand on the beam’s center—it should show zero flex.
Consequence Alert: Without this, latex/mattresses develop permanent body impressions where hips sink between slats. Most warranties require ≤2.75″ slat spacing and center support.
Build Slat Support System with Mattress-Approved Spacing

Your slats are the mattress’s foundation—improper spacing voids warranties and causes premature wear.
Correct Slat Installation Method
- Attach 1×2 cleats 1″ below the rail’s top edge along both side rails (creates a “ledge” for slats).
- Space 1×4 slats no more than 2.75″ apart—use a spacer block cut to this width for consistency.
- Rest slats on cleats (do not screw down)—this allows wood expansion. Only fasten center slats with single 1.5″ screws.
Why this works: Memory foam requires rigid, continuous support. Gaps >3″ create unsupported zones where foam compresses unevenly. For latex mattresses, reduce spacing to 2″.
Finish Wood Surfaces to Prevent Splinters and Cracks
Unfinished lumber sheds splinters onto bedding and cracks under mattress weight. Don’t skip this:
- Sand all surfaces with 120-grit paper, rounding sharp edges (especially slat tops).
- Apply wood conditioner if staining (prevents blotchiness in softwoods).
- Seal with 2 coats of water-based polyurethane—oil-based yellows over time.
Time Saver: Do this before final assembly. Reassembling a finished frame takes 15 minutes versus 2 hours for touch-ups.
Avoid These 4 Costly Bed Frame Mistakes
Skipping the Center Leg for “Temporary” Use
“I’ll add it later” becomes “my mattress has a permanent dip.” Center support isn’t optional—it’s structural physics. Install it during initial build.
Using Screws Instead of Lag Bolts for Legs
Screws shear under vertical load. Legs require 4″ lag bolts with washers to distribute pressure. Pocket screws alone fail catastrophically.
Ignoring Mattress Warranty Requirements
Most latex/memory foam warranties demand ≤3″ slat spacing and rigid center support. Document your frame with photos before installation.
Building on Uneven Floors
A 1/4″ floor slope creates 2″ of rail misalignment. Place shims under legs before final assembly—test with a level on the center beam.
Alternative Designs: Pallet, Low-Profile, and Adjustable Bases
Budget Pallet Platform (Under $50)
- Source heat-treated pallets (look for “HT” stamp—avoid chemically treated “MB” pallets).
- Disassemble, sand planks smooth, and arrange in a queen-sized rectangle.
- Stack two layers with staggered seams, glue, and screw together.
Best for: Low-profile beds (10″ height) on hard floors—add casters for mobility.
Modern Low-Profile Platform
- Build a 4″ tall frame using 2x4s instead of 2x12s.
- Cover with 3/4″ plywood (sanded and sealed) instead of slats.
- Attach to wall with French cleats for earthquake safety.
Why it works: Eliminates slat gaps entirely—ideal for luxury foam mattresses requiring solid bases.
Final Assembly: Placing Slats and Mattress Correctly
Your last critical step ensures immediate comfort and longevity:
- Position the frame in your room—test for wobble on actual flooring (carpet hides instability).
- Lay slats on cleats, starting from the headboard. Verify spacing with a tape measure.
- For memory foam: Add a 1″ bunkie board over slats if your warranty demands solid contact.
- Gently lower your mattress—never drop it. Shift slightly to seat it evenly.
Pro Check: Sit on all four corners. If you hear creaking, tighten lag bolts before use.
You’ve just built a bed frame without a box spring that outperforms store-bought versions at half the cost. This foundation delivers hospital-grade support for orthopedic comfort while slashing your bedroom’s visual clutter. Remember: the center beam and ≤2.75″ slat spacing aren’t suggestions—they’re your mattress’s lifeline. For ongoing care, flip your mattress quarterly and re-tighten lag bolts annually. Ready to customize? Paint the frame matte black for industrial chic or stain it walnut for rustic warmth. Your perfect sleep sanctuary starts tonight—no box spring required.


