
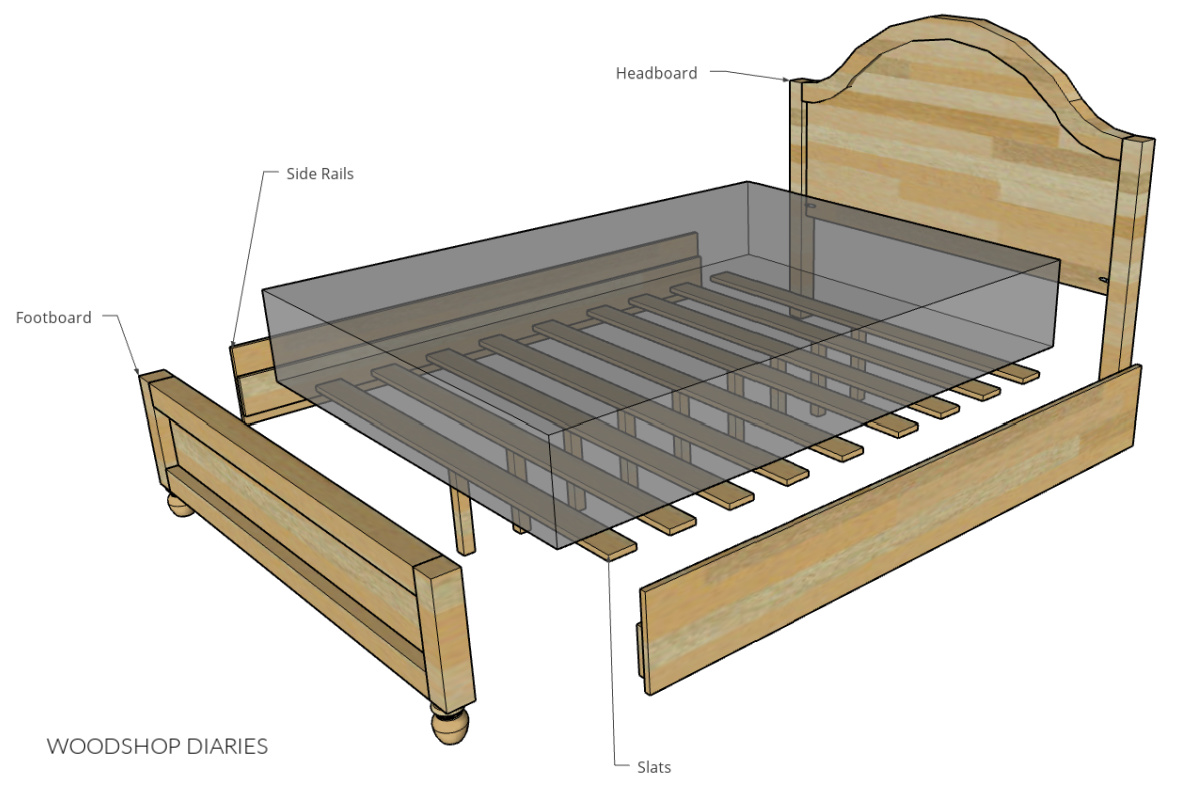
Your mattress sliding off a flimsy store frame or paying $800 for a basic bed setup isn’t just frustrating—it’s unnecessary. Building your own bed frame with headboard and footboard puts you in control of quality, cost, and customization while creating a sturdy centerpiece for your bedroom. This guide cuts through the guesswork to show you exactly how to make a bed frame with headboard and footboard that outlasts big-box alternatives, using standard tools and lumber. You’ll save hundreds while crafting a queen-size frame (60.5″ x 80.5″ interior) with professional-grade joints and zero squeaks—all in under a weekend.
Skip the generic “beginner’s guides” that ignore critical structural failures. We focus on battle-tested techniques from builders who’ve repaired collapsing DIY beds: precise mattress clearance measurements, non-negotiable center support, and commercial-grade hardware that prevents wobble. By the end, you’ll have a bed frame that handles 600+ lbs of dynamic weight and looks like custom furniture.
Required Tools for Building a Queen Bed Frame with Headboard
Gathering the right tools prevents mid-project frustration and ensures joints stay tight for years. Skipping safety gear or using subpar hardware guarantees a wobbly, noisy bed—never rely on basic wood screws alone for structural connections.
Essential Tools Checklist
- Cutting Tools: A circular saw with a carbide-tipped blade (for clean 2×4 cuts) or miter saw for angled posts.
- Drilling Must-Haves: Power drill/driver, 3/16″ drill bit for lag bolts, countersink bit, and Kreg Jig for pocket holes (critical for hidden, strong joints).
- Measuring & Leveling: Tape measure, speed square (to verify 90° corners), and carpenter’s level (prevents rocking).
- Safety Non-Negotiables: Safety glasses (wood chips cause 20,000+ eye injuries yearly) and hearing protection.
Critical Hardware Mistakes to Avoid
Using drywall screws or undersized bolts causes joint failure. For queen beds:
– Lag bolts: 3.5″ with washers for post-to-rail connections (prevents wood splitting).
– Bed rail fasteners: Commercial metal brackets (like Bed Brackets®) that hook side rails to headboard posts—never screw directly into end grain.
– Screws: 3″ #10 deck screws for frame assembly; 2.5″ for slats.
Exact Queen Bed Frame Dimensions: Avoid Mattress Fit Failures
Building to exact mattress size (60″ x 80″ for queen) traps your mattress like a vise. Pros add clearance so sheets stay tight and mattresses slide effortlessly—a 0.5″ gap on all sides is the industry standard.
Why Your Measurements Must Include Clearance
Mattresses compress slightly when sat on, and bedding adds bulk. Without this gap:
– You’ll tear sheets during bed-making.
– Mattress edges get trapped, causing premature wear.
– Visual cue: After assembly, slide a quarter between the frame and mattress—if it’s tight, the gap is correct.
Cutting Your Lumber for Precision Fit
For a queen frame interior:
1. Side rails: Cut two 2x6s to 80.5″ (length).
2. End rails: Cut two 2x6s to 60.5″ (width).
3. Center support beam: One 2×6 at 80.5″ (runs lengthwise under mattress).
Always cross-cut with a speed square clamped to your workpiece—measure twice, cut once.
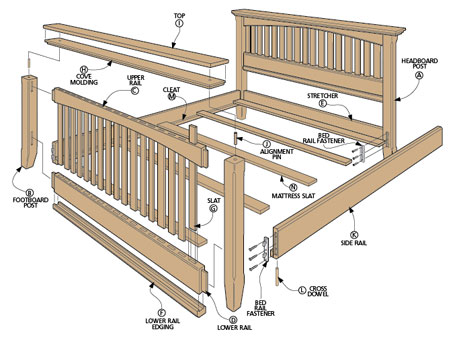
Constructing a Sturdy Headboard Frame for Queen Beds
A wobbly headboard isn’t just annoying—it’s dangerous when leaning back. The secret is a rigid internal frame with vertical 4×4 posts anchored to the floor via the side rails.
Step-by-Step Headboard Assembly
- Build the outer frame: Cut two 4×4 posts to 44″ (height) and two 2x6s to 60.5″ (top/bottom rails). Assemble into a rectangle using pocket holes and wood glue.
- Add cross-bracing: Install a horizontal 2×4 brace 12″ below the top rail to prevent bowing when weight is applied.
- Attach posts: Secure 4×4 posts to frame corners with 3.5″ lag bolts (pre-drill holes to avoid splitting). Critical: Use a level to ensure posts are plumb—tilted posts cause frame stress.
Building the Main Bed Frame Rails Without Sagging
Side rails that bow inward under weight crack slats and ruin mattress support. This is the #1 failure point in DIY queen beds—fixed only with a center support beam and proper joinery.
Assembling the Frame Perimeter
- Lay out rails: Position side rails (80.5″) between end rails (60.5″).
- Check for square: Measure diagonals—both must equal 99.5″ for a true rectangle. Adjust until measurements match.
- Secure corners: Clamp rails, then drill pilot holes. Attach with 3″ deck screws and wood glue (apply glue to all mating surfaces).
Installing the Non-Negotiable Center Support
Skip this for king/queen beds = guaranteed sagging within 6 months.
– Cut a 2×6 to 80.5″ and position it centered between side rails.
– Attach with 3″ screws every 12″ into side rails.
– Add two 4×4 legs (cut to height from floor to beam bottom) under the beam—this transfers weight directly to the floor.
Securing Headboard and Footboard with Bed Rail Fasteners
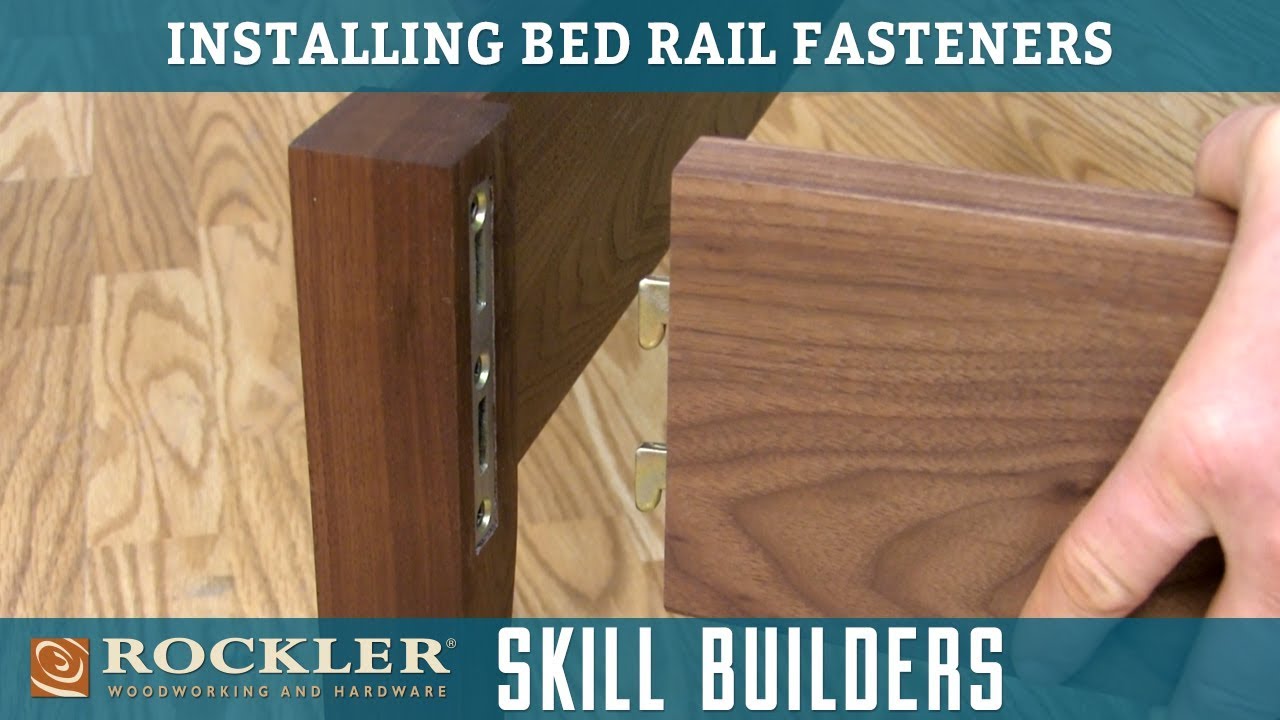
Screwing headboards directly to side rails creates weak end-grain joints that strip out under pressure. Commercial bed rail fasteners (under $20) allow movement while preventing separation.
How to Install Bed Rail Brackets Correctly
- Mount brackets to posts: Attach metal L-brackets to headboard/footboard posts 2″ below the top rail using 3″ screws.
- Hook side rails: Slide the side rail’s U-shaped bracket into the post bracket until it clicks.
- Test stability: Push down firmly on the headboard top—it should not pivot away from the wall. If it does, lower the bracket position.
Installing Proper Slats to Prevent Mattress Damage
Solid plywood bases suffocate mattresses, trapping moisture that breeds mold. Slatted bases with ≤3″ spacing are essential for airflow and support—too wide, and memory foam sags; too narrow, and you waste wood.
Slat Spacing and Attachment Guide
- Cut slats: Use 1×4 pine boards at 59.5″ (for queen width).
- Spacing: Position first slat 1″ from frame edge, then space 2.5″ apart (use a spacer block for consistency).
- Secure slats: Drill pilot holes, then screw into side rails with 1.5″ screws—never glue slats (wood expansion causes cracks).
Critical Center Support for Queen and King Bed Frames
Queen beds need at least one center leg; kings require two legs spaced 24″ apart. Skipping this overloads the frame, causing catastrophic failure under weight.
Why Your Center Leg Must Touch the Floor
- Consequence of failure: A 200-lb person sitting on the edge exerts 300+ lbs of leverage force on side rails.
- Pro tip: Place a business card under the center leg—if you can’t slide it out, the leg is properly tensioned against the floor.
Sanding and Finishing Your DIY Bed Frame Smoothly
Rushed sanding leaves splinters and uneven stain—especially on soft pine. Go slow to avoid sand-through on edges where you’ll rest your arms.
Foolproof Sanding Sequence
- Coarse grit: 80-grit on all surfaces to remove tool marks (follow wood grain).
- Medium grit: 120-grit to smooth transitions.
- Fine grit: 220-grit on edges and surfaces you’ll touch (headboard top, posts).
Apply wood conditioner before staining pine—it prevents blotchiness.
Eliminating Squeaks in Your Homemade Bed Frame
Squeaks come from wood-on-wood friction at joints. Fix this during assembly—it’s nearly impossible to silence later.
3-Step Anti-Squeak Protocol
- Rub candle wax on all rail contact points before assembly.
- Place felt pads between slats and frame rails.
- Tighten all hardware after the first night—wood compression creates initial gaps.
Final Stability Test: Avoid Bed Collapse Risks
Never skip this test: Apply 150+ lbs of force to every corner and the center while listening for creaks. A safe bed frame won’t shift more than 1/8″.
What to Do If Your Frame Fails the Test
- Wobbling side-to-side: Reinforce corners with metal L-brackets screwed into frame interiors.
- Creaking at headboard: Tighten bed rail fasteners and add a 2×4 diagonal brace from post to side rail.
- Sagging center: Shorten center leg by 1/16″ to increase floor pressure.
Building a bed frame with headboard and footboard yourself transforms a functional necessity into a statement piece—without the boutique markup. By nailing the mattress clearance gap, installing commercial bed rail fasteners, and never skipping the center support leg, you’ve created a bed that’s safer and sturdier than 90% of store-bought versions. For long-term care, tighten all hardware every 6 months and vacuum dust from slat gaps to maintain airflow. Ready to elevate your bedroom? Try adding upholstered headboard panels or stained wood accents in your next build—your DIY journey has just begun.


