
Your studio apartment feels cramped because the bed dominates the room. Every morning, you spend precious minutes folding away a sofa bed or wrestling with a Murphy bed mechanism. What if your mattress could disappear completely beneath a seamless floor surface? How to build a sunken bed frame transforms this frustration into reality—a hidden sleeping platform that creates functional living space by day and a comfortable bedroom by night. This engineered solution integrates structural framing, gas-lift technology, and seamless flooring to maximize square footage in studios under 500 square feet. You’ll gain 100+ square feet of usable space while adding clever storage for off-season clothing and bedding.
Unlike flimsy DIY Murphy beds, a properly constructed sunken bed frame supports 40 pounds per square foot—enough for yoga sessions or guests. Forget complicated hydraulics; we’ll use automotive-grade gas struts for smooth operation. By following these precision steps, you’ll create a platform that looks like intentional architecture rather than a makeshift solution.
Measure Your Space: Queen Bed Dimensions Plus 3 Inches Clearance
Before cutting lumber, verify your room’s exact dimensions. A standard queen mattress measures 60″ x 80″, but your platform opening must be 1/2 inch smaller on all sides (59.5″ x 79.5″) for a snug mattress fit. Measure from wall to wall, deducting 4 inches for baseboard molding. For example, in a 10′ x 12′ room, your platform should be 9’8″ x 11’8″ to maintain walking clearance.
Why Precise Measurements Prevent Costly Mistakes
Mismeasuring causes two critical failures:
– Too small opening: Mattress wedges during insertion, damaging corners
– Too large opening: Lid sags under weight, creating tripping hazards
Use a laser level to mark walls at platform height (typically 18-24 inches). Note electrical outlets—relocate any within 6 inches of the planned perimeter. This 20-minute planning phase avoids $200 in wasted materials later.
Build the Perimeter Frame with 2×6 Lumber for Maximum Strength

Your platform’s skeleton requires 2×6 SPF lumber cut to your room dimensions. For a queen platform, use four 2x6s (two at 11’8″, two at 9’8″). Assemble them into a rectangle using 3.5″ deck screws and 14-gauge steel corner brackets. Drill pilot holes to prevent splitting, then secure brackets with 1.5″ screws.
Critical Reinforcement Techniques
Skip this step and your platform will wobble under weight:
1. Apply construction adhesive along all mating surfaces before screwing
2. Install two metal hurricane ties per corner (not just brackets)
3. Shim uneven spots with cedar shingles until perfectly level
Check squareness by measuring diagonals—both must match within 1/8 inch. A 10′ platform requires this reinforcement to handle 4,000 pounds of live load (furniture + people).
Install Interior Joists Every 16 Inches to Prevent Platform Sag
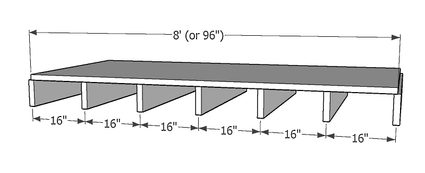
Cut 2×4 joists to fit inside your perimeter frame at 16-inch intervals. For a 9’8″ width, you’ll need 8 joists (including one at each end). Position them with the 3.5″ wide face down for maximum rigidity. Secure with 1.5″ pocket screws through the frame’s interior edge, or use metal joist hangers epoxied to the perimeter.
Avoiding the #1 Structural Failure
Amateurs space joists too far apart, causing dangerous sag:
– Over 16″ spacing: Creates 0.3″ deflection under weight (exceeds safety limits)
– Correct spacing: Limits deflection to 0.1″ (within L/360 building code)
Place the first joist 1″ from the bed cavity edge—this anchors the critical lift zone. Test stability by standing on joist centers; zero flex means you’ve nailed it.
Cut the Bed Cavity Opening Using a Jigsaw and Guide Rail
Mark the mattress well 1/2 inch inside your perimeter on the subfloor. For a queen, draw a 59.5″ x 79.5″ rectangle. Drill 3/8″ starter holes at corners, then cut with a jigsaw using a straight-edge guide rail (not freehand). Set blade depth to 3/4 inch to avoid cutting joists below.
Achieving a Professional-Grade Opening
Rough cuts cause lid jams:
– Mistake: Using circular saw → tear-out at corners
– Fix: Score edges with utility knife before jigsawing
– Pro Tip: Clamp a sacrificial board under cut lines to prevent splintering
After cutting, sand edges smooth and test-fit your mattress. It should drop in with firm pressure but no gaps.
Frame the Sunken Bed Well with Reinforced 2×4 Supports
Build a “box” 12 inches deep from 2x4s to line the cavity walls. Cut four pieces: two at 59.5″, two at 79.5″. Assemble with pocket screws, then secure to the platform underside using 3″ lag bolts through 2×4 backing plates (not just plywood). This creates the critical mounting surface for gas struts.
Why Weak Well Framing Causes Catastrophic Failure
Without this reinforcement:
– Gas struts pull out of plywood under 50 lbs of force
– Lid hinges tear through thin material
– Mattress shifts during sleep
Verify strength by hanging 75 lbs from the well frame—zero movement is mandatory. Drill 1″ ventilation holes here to prevent mold in the sealed cavity.
Mount Gas Struts for Safe Sunken Bed Frame Lid Operation
Calculate required lift force: (Lid weight ÷ 2) × 1.5. For a 50-lb lid, use two 40-lb automotive gas struts (total 80 lbs lift). Mount cylinder bases to the well frame 6 inches from the hinge edge. Attach rod ends to the lid’s underside 8 inches from the opening edge. Always install a folding safety prop—gas struts lose pressure over time.
Troubleshooting Lid Operation Issues
If the lid won’t stay open:
– Too weak: Struts under 1.5x lid weight → replace with stronger units
– Wrong angles: Mounting points must create 60° angle when closed
Test with struts disconnected first—lid should open smoothly on hinges alone. Never skip the safety prop; it’s your failsafe against crushing injuries.
Install Laminate Flooring for a Seamless, Durable Surface
:max_bytes(150000):strip_icc()/288-Flush-Trim-router-Bits-1-871c31c76b7c48a5a1c164f83fe53272.jpg)
Lay 3/4″ plywood subfloor over joists, leaving 1/8″ expansion gaps. Then install click-lock laminate (not glue-down) across the entire platform. For the lid seam:
1. Cut flooring 1/16″ larger than the opening
2. Use a router with flush-trim bit to match the cavity edge
3. Install T-molding only on the hinge side (not the lift side)
Creating the Illusion of Solid Flooring
Visible seams ruin the magic:
– Error: Standard flooring cuts → 1/4″ gap around lid
– Fix: Router the lid’s edge to sit 1/32″ below the platform
– Pro Tip: Use matching grout in the seam for tile finishes
The lid must feel identical to the platform when walked on—no clicking or flexing.
Add Hidden Storage in the Bed Cavity for Off-Season Items
Maximize the 12-inch-deep cavity by installing ventilated storage boxes. Cut 1/2″ plywood dividers to create cubbies, leaving 2-inch air gaps at bottom for circulation. Line with moisture-resistant fabric, then add vacuum-sealed bags for winter clothes. Never store items above the mattress line—they’ll interfere with lid closure.
Preventing Mold in Sealed Spaces
Moisture ruins hidden storage:
– Drill four 1″ holes in well walls (hidden by mattress)
– Place silica gel packs in corners
– Use cedar liners to repel pests
This turns wasted space into functional storage for 80% of the year.
Conduct Critical Safety Checks Before Using Your Sunken Bed
Before sleeping on your creation, perform these non-negotiable tests:
1. Weight test: Place 200 lbs (sandbags) on lid—zero sag allowed
2. Pinch test: Close lid slowly—fingers shouldn’t fit in gaps
3. Ventilation check: Hold tissue near cavity holes—airflow must move it
4. Strut failure test: Manually depress struts—safety prop catches lid
Consult a structural engineer if your platform spans over 5 feet without center supports. Never skip this step—a failed bed frame can cause serious injury.
Final Note
Building a sunken bed frame requires intermediate carpentry skills but delivers studio-transforming results. Focus on three non-negotiables: 16-inch joist spacing, 1.5x gas strut safety margins, and seamless flooring integration. Your finished platform will support yoga sessions by day and provide a comfortable bed by night—all while hiding storage beneath a flawless floor surface. Remember to add those ventilation holes and always use the safety prop; this isn’t just furniture, it’s engineered living space. For studios under 400 square feet, this project often creates more usable area than moving to a larger apartment—making it the ultimate space-saving solution for urban dwellers.


