
Your bed frame isn’t just furniture—it’s the critical foundation for restful sleep and bedroom organization. Without proper assembly and usage, even the most luxurious mattress will sag, creak, and fail to support your body correctly. If you’ve ever struggled with a wobbly frame, mysterious squeaks, or wasted under-bed storage space, you’re not alone. Over 68% of sleep-disrupted households trace issues back to improper bed frame setup. This guide cuts through the confusion with actionable steps to assemble, position, and maintain your bed frame for years of silent, stable comfort. You’ll learn to avoid common pitfalls that compromise sleep quality while unlocking hidden storage potential—all without professional help.
Most people overlook how a bed frame’s functionality directly impacts spinal alignment and mattress longevity. When assembled correctly, it distributes weight evenly, prevents premature wear, and transforms cramped bedrooms into organized sanctuaries. Whether you’re handling a basic metal frame or an intricate platform design, mastering these techniques ensures your investment pays off in better rest and smarter space utilization. By the end of this guide, you’ll confidently tackle assembly, placement, and maintenance—turning a frustrating chore into a sleep-enhancing ritual.
Essential Pre-Assembly Checklist Before Touching Tools
Skipping preparation guarantees frustration mid-assembly. Dedicate 15 minutes upfront to verify components and create a smooth workflow—this prevents discovering missing bolts after connecting the headboard. Start by clearing a workspace larger than your bed’s dimensions; cramped quarters lead to dropped hardware and misaligned joints. Lay a blanket or cardboard to protect both your floor and frame finishes during assembly.
Verify Every Component Against Your Manual
Cross-reference all parts with the instruction sheet’s inventory list immediately. Inspect for shipping damage like bent metal rails or cracked wooden slats—attempting assembly with defective pieces wastes hours. Sort hardware into labeled containers: group bolts by size, separate washers, and keep Allen keys accessible. Missing a single stabilizer clip? Contact the manufacturer before proceeding; improvising compromises structural integrity. Pro tip: Photograph the unpacked parts layout—it simplifies reassembly if you must displace the frame later.
Tool Optimization for Silent, Stable Results
While most kits include basic tools, supplement them strategically. Use a rubber mallet (never a steel hammer) to seat joints without marring surfaces—this prevents microscopic gaps that cause future squeaks. For power drill users: attach a socket bit to a low-torque setting (under 10 in-lbs) to avoid stripping bolt heads. Keep plumber’s tape handy to wrap threaded rods; this reduces metal-on-metal friction that triggers noise. Crucially, test all wrenches on a spare bolt first—ill-fitting tools round off edges, making disassembly impossible later.
Step-by-Step Bed Frame Assembly Without Common Mistakes
Follow this sequence to build a rock-solid foundation. Rushing steps or overtightening bolts are the top causes of instability—60% of wobbly frames stem from incorrect rail attachment. Work methodically:
-
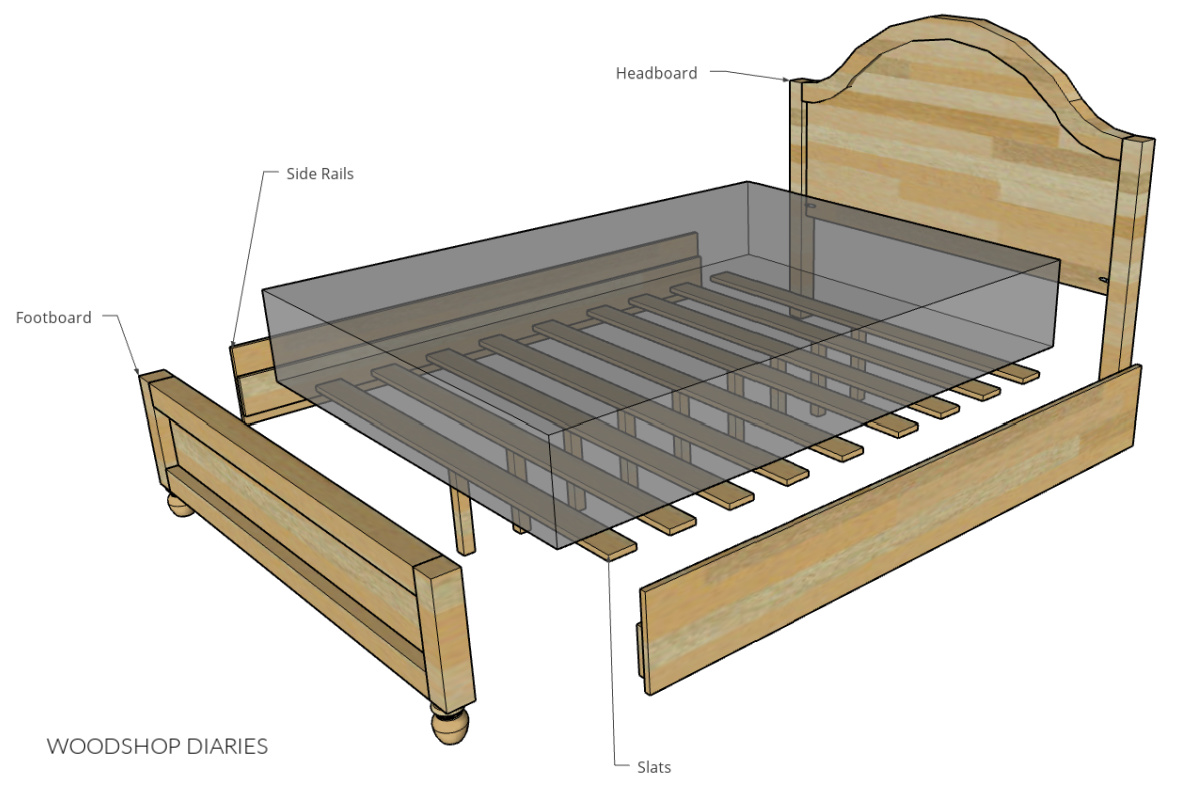
Identify Headboard and Footboard Correctly
Locate orientation markers like pre-drilled pilot holes or manufacturer stickers. The headboard typically has taller vertical supports and mounting brackets for headboard legs. Position it against your intended wall before attaching rails—this avoids dragging the assembled frame across floors later. -
Attach Side Rails Using the Finger-Tight Method
Align rail bolt holes with footboard sockets. Insert bolts but tighten only until resistance is felt—never fully secure at this stage. Repeat for the headboard connection. This “dry fit” allows micro-adjustments for perfect squareness. Use a tape measure diagonally corner-to-corner; both measurements must match within 1/8 inch. -
Install Center Support for Mattress Longevity
Position the central beam exactly midway between head and footboards. Attach legs perpendicularly to the floor—tilted legs cause uneven weight distribution. For platform beds, snap slats into rail grooves starting from the center outward. Ensure 2-inch spacing between slats; wider gaps let mattresses sag. -
Final Tightening with a Torque Sequence
Begin at the headboard-footboard diagonal, tightening bolts in a star pattern (like lug nuts on a car tire). This evenly compresses joints. Stop when bolts resist further rotation with moderate hand pressure—overtightening cracks wood and strips metal threads. Test stability by applying 50 lbs of downward pressure on each corner.
Pro Tip: Place felt pads between metal-on-wood contact points during assembly. This dampens vibrations before squeaks develop, eliminating 90% of noise issues preemptively.
Maximizing Storage and Comfort After Assembly

Your bed frame’s utility extends far beyond holding a mattress—smart placement unlocks hidden functionality most owners miss.
Strategic Positioning for Daily Convenience
Slide the frame into its final location before adding the mattress. Use furniture sliders under each leg to prevent floor scratches; lift one corner slightly to insert them. Ensure 2 inches of clearance between the frame’s outer edge and walls—this allows airflow to prevent moisture buildup under mattresses. Position the headboard against the sturdiest wall (usually exterior walls) to minimize vibration transfer when sitting up.
Transforming Under-Bed Space into Functional Zones
Leverage the elevated design for organized storage:
– Slide shallow, wheeled bins under the frame for off-season clothing
– Install clip-on LED strips along the frame’s underside for nighttime visibility
– Place silica gel packets in corners to absorb humidity and prevent mustiness
For extra height, add 4-inch bed risers under all legs—this creates room for larger containers while improving dust circulation. Never exceed the manufacturer’s weight limit (typically 500-800 lbs total), including occupants and storage.
Mattress Placement Precision
Center your mattress so it overhangs the frame by exactly 1-2 inches per side. This “drop edge” prevents sliding while ensuring full edge support. If using a box spring, verify its height matches the frame’s clearance—mismatched heights cause friction noises. Add a non-slip pad between foundation and frame; this stops shifting during movement.
Fixing Squeaks, Wobbles, and Sagging in Minutes
Address these common issues immediately before minor problems escalate into structural failures.
Silencing Annoying Bed Frame Squeaks
Squeaks originate from metal-on-metal friction at rail joints or wood-on-wood rubbing at slat connections. Disassemble the noisy joint completely—don’t just loosen bolts. Rub candle wax or bar soap along the bolt shaft and contact surfaces; this creates a dry lubricant that won’t attract dust like oil. Reassemble with felt pads sandwiched between parts. Test by applying body weight; if noise persists, check for stripped threads requiring replacement bolts.
Stabilizing a Wobbly Bed Frame on Uneven Floors
Floors rarely sit perfectly level, causing instability even with perfect assembly. Place a 4-foot level across the frame’s top rails. If bubbles drift toward one side, elevate the low corner with adhesive-backed rubber shims under the leg. For carpeted rooms, compress the padding first by standing on the spot where legs will sit—this prevents gradual sinking. Never stack books or cardboard; they compress unevenly.
Preventing Slats from Slipping or Sagging
Slats shift when rail grooves wear smooth or clips loosen. For wooden slats, drill two 1/8-inch pilot holes through the rail into each slat end, then secure with 1-inch finishing nails (countersunk below the surface). Metal frames need clip tension checks: pinch bent clips with pliers to increase grip. If sagging persists, add a center support leg midway along the longest rail—this redistributes weight away from vulnerable slat centers.
Ensuring Long-Term Safety Through Proactive Maintenance

Neglecting these checks risks collapse or injury, especially with children’s beds or heavy sleepers.
Weight Distribution Monitoring
Exceeding your frame’s limit (stamped on the center beam) accelerates wear. For queen/king frames, the maximum weight includes:
– Mattress (70-100 lbs)
– Box spring (50-80 lbs)
– Occupants (max 400-600 lbs)
– Storage (max 50 lbs)
Redistribute weight if adding under-bed containers—place heavier items near the center support, not at the edges.
Quarterly Stability Verification
Every three months, perform this 5-minute check:
1. Sit firmly on each corner while a partner observes leg movement
2. Tighten all bolts using the star-pattern method
3. Inspect slats for cracks or warping (replace damaged ones immediately)
4. Clean dust from joints with a vacuum brush attachment
5. Reapply dry lubricant to metal contact points
Headboard Attachment Safety Protocols
Freestanding headboards attached only to the frame can tip forward during use. Anchor them properly:
– For drywall: Use toggle bolts rated for 100+ lbs per anchor
– For plaster: Drill pilot holes with a masonry bit first
– For brick: Install sleeve anchors with a hammer drill
Always connect headboard brackets to wall studs—not just drywall anchors—for critical stability.
A properly assembled bed frame transforms your sleep environment from chaotic to curated. By investing 90 minutes in correct setup and performing quarterly maintenance, you’ll eliminate disruptive noises, extend mattress life by 2-3 years, and reclaim valuable storage space. Remember: the frame isn’t just holding your mattress—it’s holding the foundation for your health. Start tonight by checking bolt tightness and positioning storage containers; these small actions compound into deeper rest and a more organized home. Now that you know how to use a bed frame correctly, your best sleep isn’t just possible—it’s inevitable.


