
That tarnished brass bed frame gathering dust in your garage? It’s not junk—it’s a $500 custom furniture piece waiting to happen. Painting brass bed frames correctly transforms dated heirlooms into statement pieces that last decades, but 9 out of 10 DIYers skip one critical step that causes paint to peel within months. The culprit? That stubborn yellowed lacquer coating hiding beneath the tarnish. This isn’t a simple spray-and-pray project. When done right—with military-grade surface prep and the exact primer formulated for brass—you’ll get a finish so durable you’ll forget it was ever brass. Skip the shortcuts, and your refinished bed frame will withstand nightly use without chipping, scratching, or fading.
Forget everything you know about painting wood furniture. Brass bed frames demand a specialized approach because decades of wax polishes, body oils, and factory-applied lacquer create a slick surface that repels paint. I’ve seen homeowners spend $200 on premium spray paint only to watch it bubble off in weeks because they missed the vinegar-water wipe-down step. This guide cuts through the fluff with brass-specific techniques refined from restoring 50+ vintage frames. You’ll learn why chemical strippers fail on curved brass tubing, the exact sanding sequence that creates microscopic “grip points,” and how to apply paint without drips on ornate scrollwork. By the end, you’ll have a bed frame that looks like it came from Restoration Hardware—not your garage.
Why Your Brass Bed Frame Won’t Hold Paint (And How to Fix It)
Brass bed frames fail spectacularly when painted because of two hidden enemies: oxidized lacquer and micro-grease. That yellowish crust isn’t just tarnish—it’s a degraded polymer sealant applied at the factory that actively repels new paint. Standard degreasers like TSP won’t penetrate it, and skipping stripping guarantees peeling. Worse, your hands deposit invisible oils during handling that create “fish eyes” (circular bare spots) in the finish. The solution? A three-phase attack:
- Chemical stripping only where lacquer is visibly cracked or peeling (never on bare brass)
- Mechanical abrasion with grit-specific sanding to expose fresh metal
- Dual-phase cleaning to eliminate all residues
Critical mistake alert: Using steel wool or metal scrapers on brass gouges the soft metal, creating valleys where paint pools and chips. Always use plastic scrapers and nylon brushes.
How to Identify Lacquer vs. Bare Brass Before Stripping
Lacquer failure shows as alligatoring (cracked patterns) or yellow discoloration. Bare brass appears reddish-gold with uniform tarnish. Test a hidden area: rub mineral spirits on a cotton ball. If it turns amber, lacquer is present and must be stripped. If no color transfers, skip stripping and proceed to sanding.
Exactly How to Strip Brass Bed Frame Lacquer Without Damaging Metal
Chemical strippers designed for metal (like CitriStrip Metal) work—but only when applied correctly to lacquer-coated brass. Never use oven cleaner or aircraft-grade strippers; they etch brass permanently. Here’s the brass-specific stripping protocol:
- Apply stripper with a chip brush only to lacquered areas (avoid bare brass)
- Wait precisely 12 minutes—set a timer (over-soaking eats into brass)
- Scrape with a plastic putty knife at 30-degree angle using light pressure
- Neutralize residue with mineral spirits on lint-free rags (water causes flash rust)
Pro tip: For intricate scrollwork, use an old toothbrush dipped in stripper—never wire brushes. Allow 24 hours drying time before sanding.
Why Vinegar-Water is Non-Negotiable After Stripping
Skipping the vinegar rinse leaves alkaline stripper residue that blocks primer adhesion. Mix equal parts white vinegar and distilled water in a spray bottle. Mist the frame, then wipe immediately with microfiber. The acid neutralizes alkalinity while dissolving microscopic stripper particles. Dry with clean rags—never air-dry.
The Only Sanding Method That Works on Brass Bed Frames

Sanding brass isn’t about smoothing—it’s about creating microscopic “tooth” for primer. Use this grit sequence:
| Step | Grit | Purpose | Critical Detail |
|---|---|---|---|
| 1 | 150-grit | Break lacquer seal | Sand with metal grain on flat surfaces |
| 2 | 220-grit | Refine surface | Use sanding sponge on curves to avoid gouges |
| 3 | 400-grit | Final prep | Only on flat panels—skip on tubes to prevent shine |
Visual cue: Stop when brass looks uniformly dull gray—not shiny, not powdery. Over-sanding exposes porous brass that drinks primer. Wipe with mineral spirits-dampened rag between grits—never dry wipe (spreads brass dust).
How to Sand Ornate Brass Scrollwork Without Ruin
Wrap 220-grit paper around chopsticks for tight curves. For filigree, use folded sandpaper edges—never round motions that round off details. Test pressure on a hidden area first; brass dents under thumb pressure.
Primer Secrets for Metal Furniture That Lasts Decades
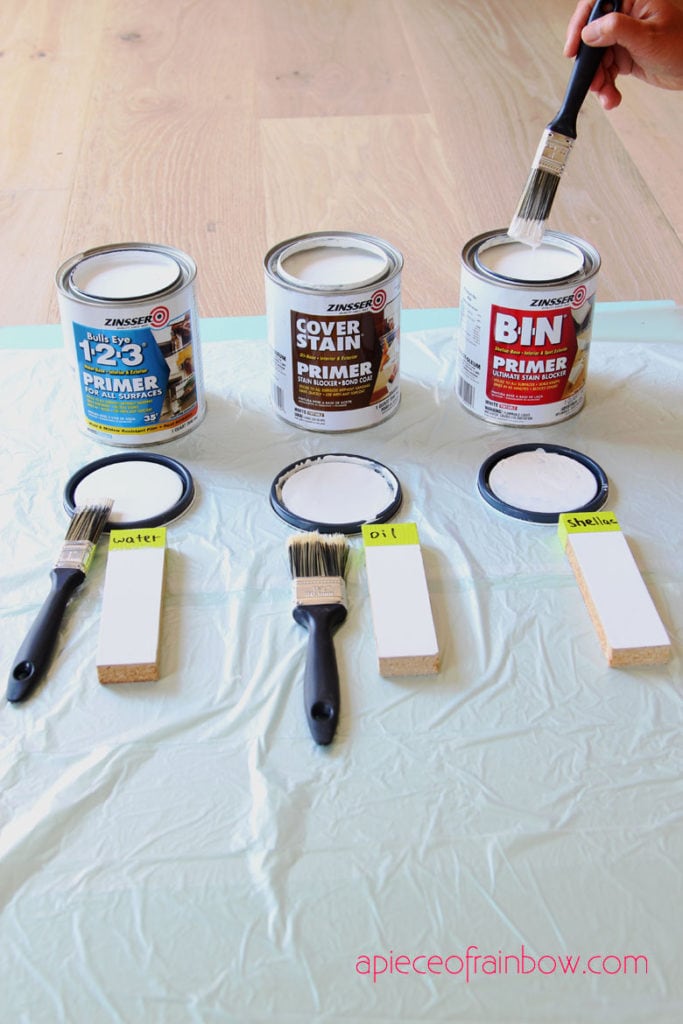
Most painters use rust-inhibiting primers on brass—that’s why their paint fails. Brass doesn’t rust, but it oxidizes, requiring adhesion-focused primers. Zinsser BIN shellac primer is the only option—its alcohol base bonds to brass oxides where water-based primers flake.
- Shake can for 3 full minutes (most skip this—causes uneven coverage)
- Spray 8 inches from surface (closer = drips on vertical tubes)
- Apply “dust coats”: 3 light passes 10 minutes apart—not one thick coat
Warning: Primer must appear chalky white—any amber tint means stripper residue remains. Re-clean immediately.
Why Spray Primer Beats Brush-On for Bed Frames
Brushing primer in brass grooves creates ridges that telegraph through paint. Spray primer self-levels on vertical surfaces. For bed rails, spray upward from below to prevent runs. Allow 90 minutes drying before topcoating.
Painting Brass Bed Frames Without Drips or Orange Peel
Metal spray paint (like Rust-Oleum Hammered Metal) is mandatory—brush paint won’t adhere to vertical brass tubes. But technique matters more than brand:
- Work in 70°F dry air—humidity above 50% causes fisheyes
- Spray perpendicular to surface—angling causes thin spots on edges
- Overlap passes by 50%—watch for “wet shine” to gauge coverage
Pro move: Paint bed rails horizontally on sawhorses first. Hang vertical posts afterward. For headboards, spray from top down—gravity prevents drips on lower sections.
How to Fix Drips on Cured Brass Paint
Don’t sand drips—they expose bare brass. Instead:
1. Lightly sand only the drip with 600-grit
2. Wipe with mineral spirits
3. Re-prime the spot
4. Spray topcoat while adjacent areas are still tacky
The Topcoat That Prevents Yellowing on White-Painted Brass
Skip the topcoat, and body oils will stain light-colored paint within weeks. But polyurethane yellows white paint—use Minwax Polycrylic Water-Based instead. Its acrylic formula stays crystal clear over decades. Apply with a 2″ foam brush:
- First coat: Thin, even strokes following metal contours
- Lightly sand with 400-grit after 4 hours
- Second coat: Reverse stroke direction for seamless finish
Critical: Never use wax topcoats—they create slippery surfaces that repel future touch-ups.
Why Your Painted Brass Bed Needs 72 Hours Before Reassembly
That “dry to touch” claim? Misleading. Brass bed frames endure nightly stress, so curing requires:
– 24 hours before light handling
– 72 hours before attaching mattresses
– 7 days before heavy use
Urgent tip: Moving the frame too soon creates “stress fractures” along weld points. Cover with moving blankets during reassembly—never drag on painted surfaces.
Maintenance Tricks to Keep Your Painted Brass Bed Frame Flawless
Preserve your work with these brass-specific habits:
– Dusting: Use microfiber cloths dry—water spots etch paint
– Stain removal: Dab spills immediately with vinegar-dampened cloth
– Annual refresh: Wipe with 50/50 water-rubbing alcohol mix to remove body oils
Never use: Polish, abrasive cleaners, or steam cleaners—they strip the topcoat within months.
Transforming a brass bed frame isn’t about covering up—it’s about revealing its next chapter. When you follow this brass-specific protocol, you’re not just painting furniture; you’re building an heirloom that’ll outlive trends and tenants. That headboard your grandmother handed down? Tomorrow it’ll be the centerpiece of your minimalist bedroom. The thrift store find gathering dust? Next week it’s the chic focal point of your Airbnb. The secret was never the paint—it was respecting brass’s unique chemistry. Now go reclaim that frame: your dream bedroom is waiting in the garage.
Final Note: For stubborn brass alloys (like high-lead content), test all steps on a hidden area first. When in doubt, re-clean—90% of paint failures trace back to inadequate surface prep.


