
Have you ever struggled with a flimsy pull-out bed frame that wobbles, sticks, or worse—collapses under weight? You’re not alone. Millions of people in small apartments, van conversions, and guest rooms waste time and money building DIY pull-out bed frames that fail within months. The difference between a frustrating failure and a reliable space-saving solution comes down to three critical factors: structural integrity, proper hardware selection, and safety mechanisms. This guide reveals exactly how to build a pull-out bed frame that withstands daily use while maximizing your limited space.
A well-constructed pull-out bed frame transforms your living area in seconds, creating a comfortable sleeping space that disappears when not needed. Whether you’re converting a van, optimizing a studio apartment, or adding guest accommodations, getting the engineering right prevents costly mistakes and potential safety hazards. By the end of this guide, you’ll know precisely how to build a pull-out bed frame that operates smoothly for years.
Why Your Pull-Out Bed Frame Needs Grade 5 Hardware (Not Hardware Store Basics)

Most DIY pull-out bed frames fail because builders underestimate the dynamic forces involved. When you sit on the edge of your bed or roll over during sleep, you’re applying forces 1.5-2 times your body weight to the frame. Standard hardware store screws and brackets can’t handle this stress long-term.
Use these exact specifications for reliable performance:
– Bolts: Minimum Grade 5 (or better Grade 8 for high-stress points)
– Screws: Structural screws like GRK RSS or Spax with minimum #10 (4.8mm) diameter
– Brackets: 14-gauge steel (1.9mm thick) with at least 1-inch mounting surface
– Thread engagement: 1.5 times the bolt diameter for secure connections
When selecting drawer slides—the heart of your pull-out mechanism—ignore the marketing hype. Look for the actual load rating per pair (not per slide). For a twin mattress supporting up to 250 lbs, use slides rated for at least 100 lbs per pair. Full or queen-sized beds require commercial-grade slides rated for 150+ lbs per pair. Always build with a 2.5x safety factor—meaning if you expect 200 lbs of weight, design for 500 lbs.
How to Measure and Cut Perfect Dimensions for Your Pull-Out Bed Frame
Incorrect measurements cause 80% of pull-out bed failures. Follow this precise process:
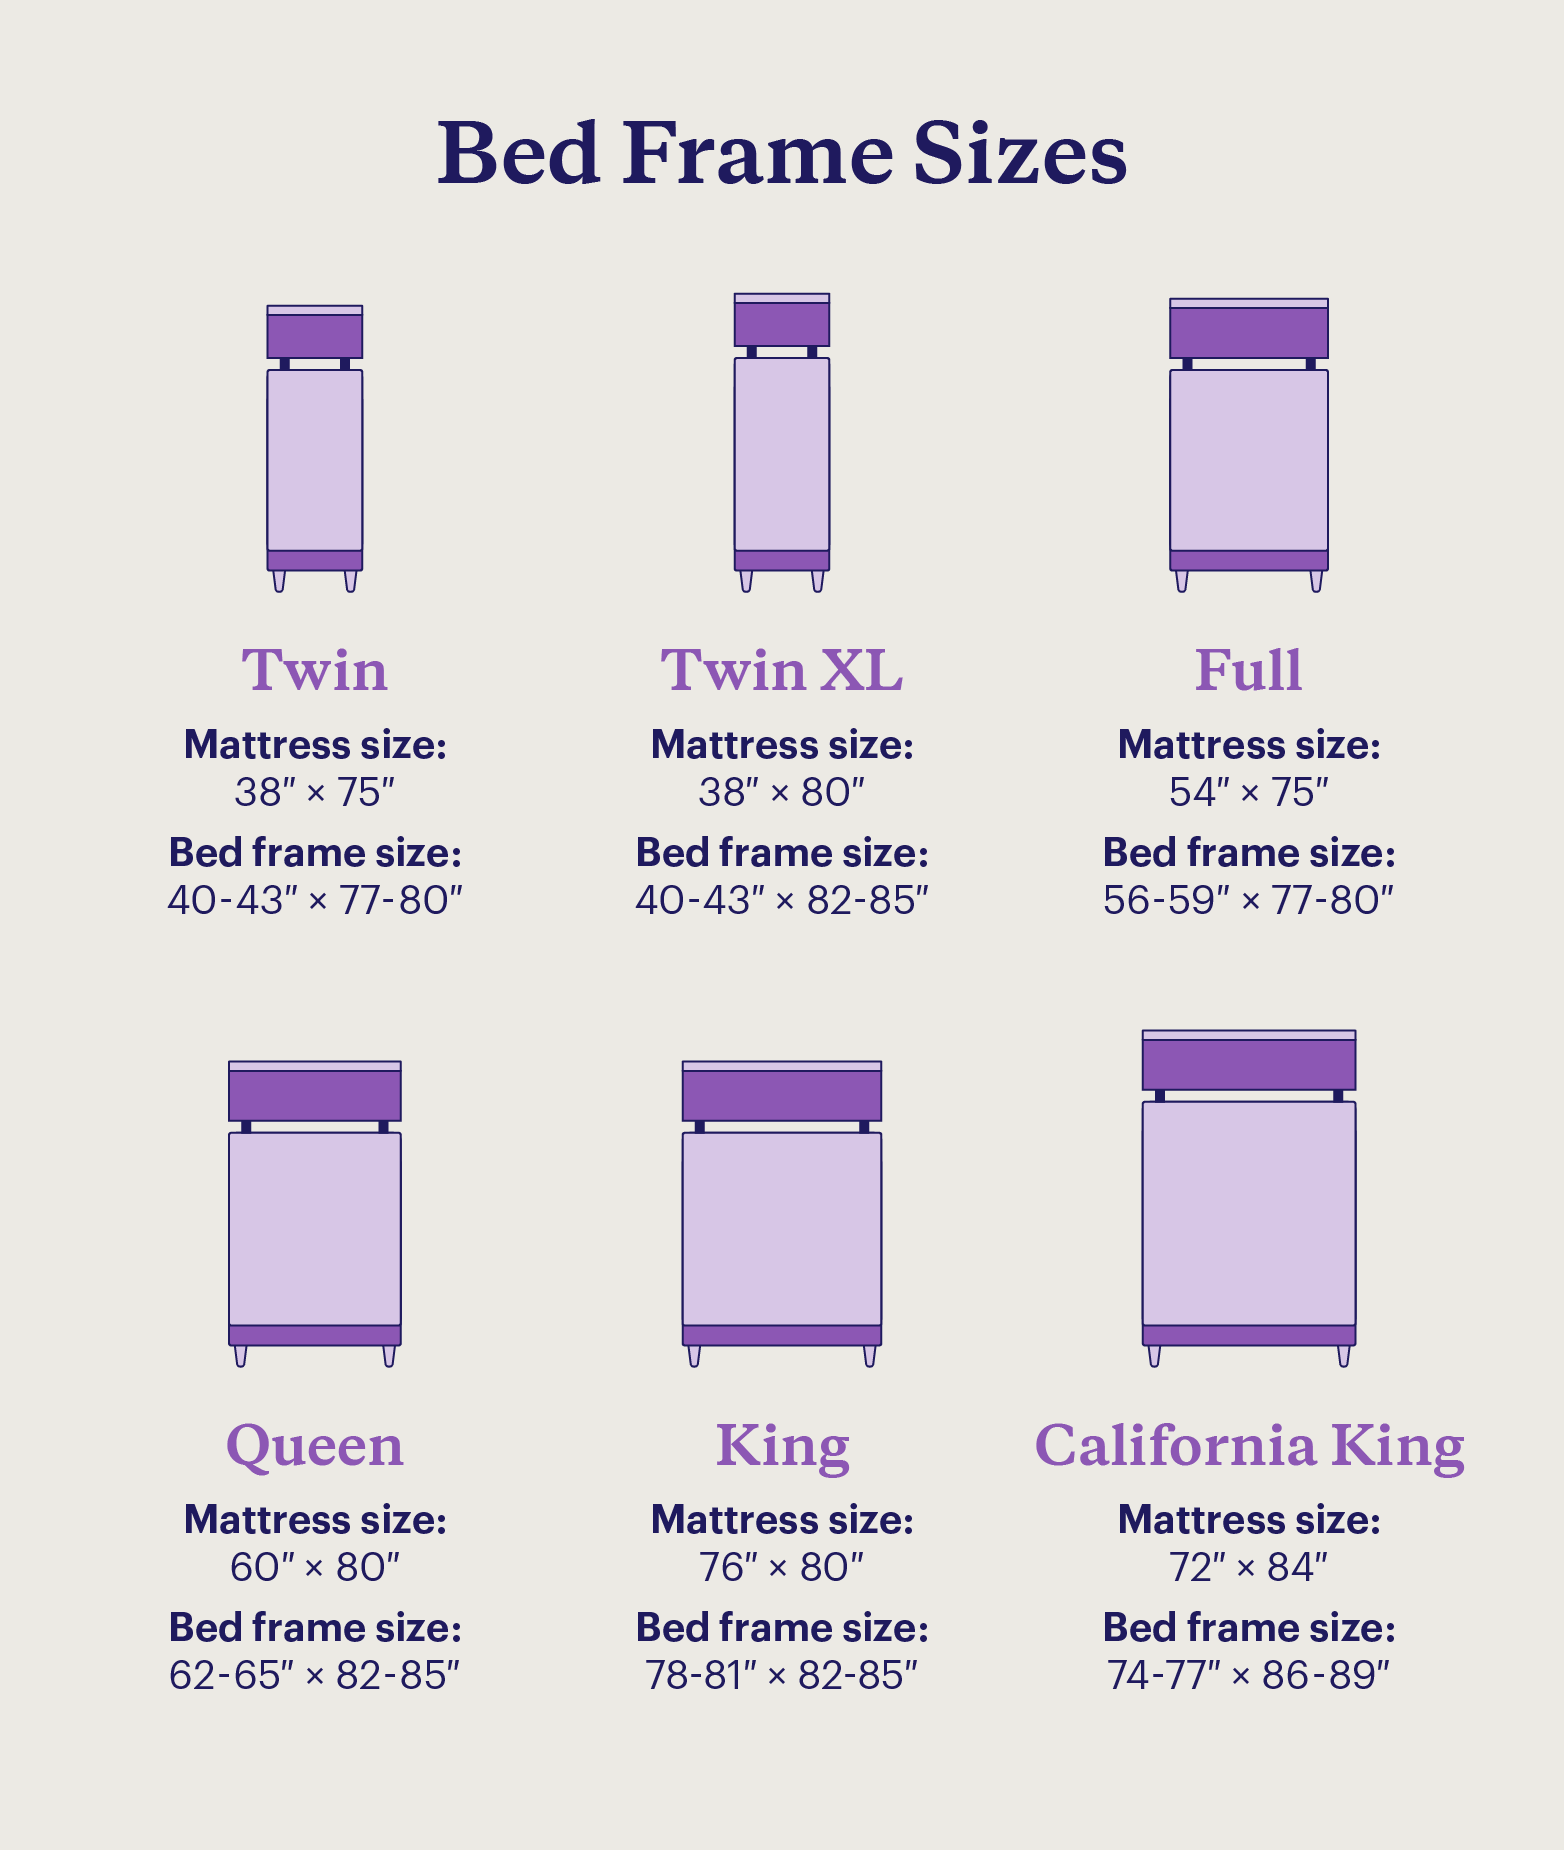
- Measure your mattress first—don’t assume standard sizes. A “twin” mattress might actually be 38″ x 74.5″, not the expected 39″ x 75″.
- Build your platform 1/4″ smaller than the mattress dimensions on all sides for smooth operation.
- Calculate track length: For a 75″ long bed, use 36″ slides (half the length plus 1-2″ for mounting hardware).
- Add vertical clearance: A 10″ mattress needs at least 12″ of cavity depth to accommodate compression.
Critical measurement mistake to avoid: Forgetting to account for the thickness of your mounting surfaces. If your frame attaches to 3/4″ plywood walls, subtract that thickness from your available space. Measure twice, cut once—especially when working with expensive hardwoods or precision-cut metal components.
Build a Rock-Solid Pull-Out Bed Platform in 4 Critical Steps
Your mattress platform must resist sagging and twisting under load. Here’s how to construct it properly:
- Frame construction: Build a perimeter frame from 2×4 lumber (50x100mm) with cross supports every 16″. Reinforce all corners with metal angle brackets and structural screws.
- Platform surface: Attach 3/4″ (19mm) plywood using 2″ structural screws every 6″ along supports. Never use staples or drywall screws—they’ll pull out under dynamic loads.
- Edge reinforcement: Add a 1×2 (25x50mm) hardwood border around the platform perimeter to prevent plywood edge damage.
- Ventilation: Drill 1/4″ holes every 6″ in the plywood if using in a van conversion to prevent moisture buildup under the mattress.
Pro tip: Before final assembly, test your frame’s rigidity by standing on it in the center. If you feel any flex, add diagonal cross-bracing or reduce the span between supports.
Install Heavy-Duty Slides for Smooth Pull-Out Bed Operation
Slide installation makes or breaks your pull-out bed frame. Follow these steps for perfect alignment:
- Mount slides to the fixed structure first—never to the moving platform. Attach to wall studs or cabinet framing, not just drywall or thin plywood.
- Use a laser level to ensure both slides are perfectly level and parallel. Even 1/16″ misalignment causes binding.
- Leave 1/4″ clearance between the moving platform and fixed structure on all sides.
- Test extension/retraction before final mounting—add shims if needed to eliminate binding.
Critical warning: If installing in a van, secure slides to structural members of the vehicle frame—not just interior panels. Van movement creates forces that can rip poorly mounted slides from their anchors.
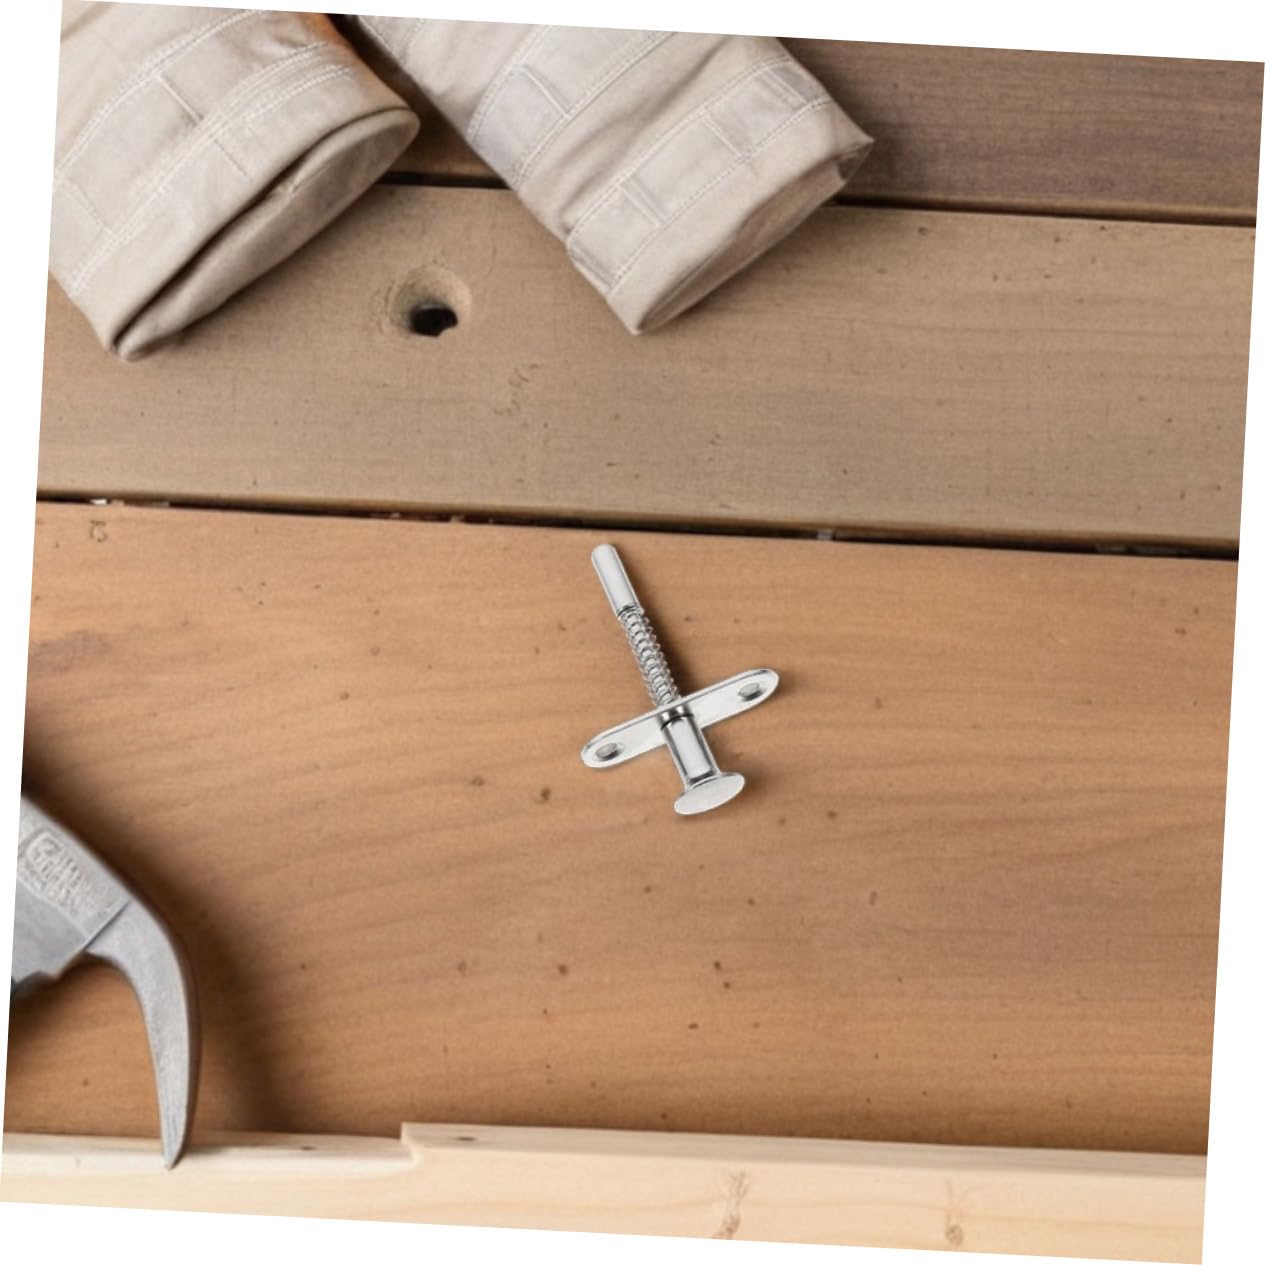
Two Non-Negotiable Safety Locks Every Pull-Out Bed Frame Must Have
Never rely solely on drawer slides to support your weight. Every pull-out bed frame requires these two safety mechanisms:
- Positive mechanical lock: Install a spring-loaded pin that drops into a hole when the bed is fully extended. This transfers weight from the slides to the lock mechanism.
- Drop-down support leg: Add a hinged leg that automatically lowers when the bed extends, providing direct vertical support. The leg must lock in place with a positive catch.
Safety test: With the bed extended, try to lift one corner. If it moves more than 1/8″, your support system is inadequate. For van conversions, add a secondary travel lock that secures the bed during vehicle movement—critical for preventing injuries during sudden stops.
Test Your Pull-Out Bed Frame Like a Professional Before First Use
Don’t skip this critical step—many builders discover failures only after putting weight on the bed. Perform these tests:
- Dry run: Extend and retract 20 times without weight. Listen for scraping or binding.
- Gradual load test: Place 50 lbs of weight (sandbags work well) and test operation. Increase to 100 lbs, then 150 lbs.
- Dynamic test: Have someone sit on the edge and rock gently to simulate real-world forces.
- Lock verification: With full weight applied, ensure safety locks engage positively and prevent accidental retraction.
Red flags that require immediate fixes: Any creaking sounds, visible flexing in the platform, or resistance during extension/retraction. Address these before allowing regular use.
Three Costly Mistakes That Ruin DIY Pull-Out Bed Frames
Avoid these common errors that turn promising projects into expensive failures:
Mistake #1: Using undersized lumber
Many builders use 1×3 framing for the platform, which flexes under weight. Always use minimum 2×4 lumber for structural members—especially for spans over 24 inches.
Mistake #2: Ignoring vertical clearance
Forgetting to account for mattress compression leads to the bed sticking when retracting. A 10″ mattress compresses to about 8.5″ under weight—design your cavity accordingly.
Mistake #3: Skipping the safety factor
Building exactly to expected weight loads fails when real-world forces hit. Always design for 2.5x your maximum expected load—this accounts for jumping on the bed or two people using it.
Pro tip: Build a small-scale model first to test your mechanism. A 1:2 scale version using scrap materials reveals design flaws before you cut expensive components.
Monthly Maintenance That Doubles Your Pull-Out Bed Frame’s Lifespan
Even the best-built pull-out bed frame needs regular care. Implement this simple maintenance routine:
- Weekly: Wipe tracks clean with isopropyl alcohol to remove dust and debris
- Monthly: Check all fasteners for tightness and re-torque to specifications
- Quarterly: Apply silicone-based lubricant (never petroleum-based) to moving parts
- Annually: Inspect wood for stress cracks and metal components for corrosion
Warning signs requiring immediate attention: Squeaking noises (indicates metal-on-metal contact), visible play in the platform, or difficulty extending/retracting. Address these before they lead to catastrophic failure.
Van Conversion Pull-Out Bed Frame Modifications You Can’t Skip
Van builders face unique challenges—here’s how to adapt your pull-out bed frame:
- Vibration compensation: Add rubber grommets between mounting points and vehicle structure to absorb road vibrations.
- Moisture management: Seal all wood components with marine-grade varnish and drill ventilation holes in the platform.
- Multi-functional design: Integrate the bed frame with storage compartments that remain accessible when the bed is extended.
- Travel locks: Install positive latching mechanisms that secure the bed during transit—required by most van conversion safety standards.
Critical van-specific tip: Always mount your bed frame to the vehicle’s structural ribs or frame—not just the interior paneling. Road forces can be 3-5x greater than stationary applications.
How to Upgrade to a Motorized Pull-Out Bed System (When You’re Ready)
Once your manual system works perfectly, consider these motorization options:
- 12V linear actuators: Ideal for van conversions, with 200-500 lb thrust capacity
- Rack and pinion systems: Provides precise control with 5:1 mechanical advantage
- Safety features: Must include obstruction sensors, manual override, and emergency stop
Important: Motorization adds complexity and potential failure points. Only add motors after your manual system has proven reliable through 50+ usage cycles. Always maintain the ability to operate manually in case of power failure.
Final Note: Building a reliable pull-out bed frame requires respecting engineering principles, not just following basic woodworking steps. By implementing these precise specifications and safety measures, you’ll create a space-saving solution that works flawlessly for years. Remember: the extra time spent on proper hardware selection and safety mechanisms pays off every time you smoothly deploy your bed without worry. Start with a small prototype, test rigorously, and never compromise on structural integrity—your safety depends on it.


