
Your king-size bedroom feels cramped, and that pile of seasonal clothes keeps migrating to the closet floor. Instead of sacrificing precious floor space to dressers, build a bed that is your storage solution. Constructing a king-size bed frame with integrated drawers solves your space crunch while delivering custom craftsmanship you can’t find in stores. This project transforms standard plywood into a sturdy, stylish storage powerhouse that supports heavy mattresses and withstands nightly use. You’ll learn exactly how to make a king size bed frame with drawers using modular construction techniques that prevent sagging and simplify moving. In just six weekends, you’ll create a furniture heirloom with four spacious under-bed drawers and two top storage units—no professional shop required.
Essential Tools and Materials Checklist for King Bed Construction
Skip this step and you’ll waste hours at the hardware store mid-project. For a king bed frame with drawers, gather these exact supplies before cutting your first board. You need 5 sheets of 4×8 ¾-inch plywood for the main frame (Baltic Birch or ApplePly recommended for splinter-free edges) and ½-inch plywood for drawer boxes. Add 30 board feet of hardwood like maple or walnut for drawer fronts—they’re optional but transform budget plywood into luxury furniture. Critical hardware includes soft-close drawer slides rated for 100+ lbs (22-inch length for king beds), lag bolts (3/8″ x 3.5″) for corner posts, and a commercial bed frame system like BedLegs or Rockler’s rail fasteners. Never skip these: a 4×4 center support leg, 2×4 lumber for cross beams, and ¾-inch plywood ribs for slat support. Your tool kit must have a table saw (non-negotiable for ripping sheet goods), Kreg Jig for pocket holes, and a drill/driver—skip the miter saw by ordering pre-cut lumber at the store.
Why Standard King Dimensions Lie (Measure Your Mattress First)
Don’t trust nominal sizes—your mattress could be 2 inches wider than “standard king” (76″x80″). Place your actual mattress on the floor and measure its exact width and length. Build the frame 1 inch smaller than these measurements to prevent binding when inserting the mattress. If you use a plush topper, add ½ inch of clearance to the frame interior. For Cal King mattresses (80″x80″), adjust all side rails accordingly. This single step prevents the #1 frustration: a frame that fits blueprints but not your bed. Record these numbers visibly on your workshop wall before cutting any wood.
Building the Frame with Mandatory King-Size Center Support
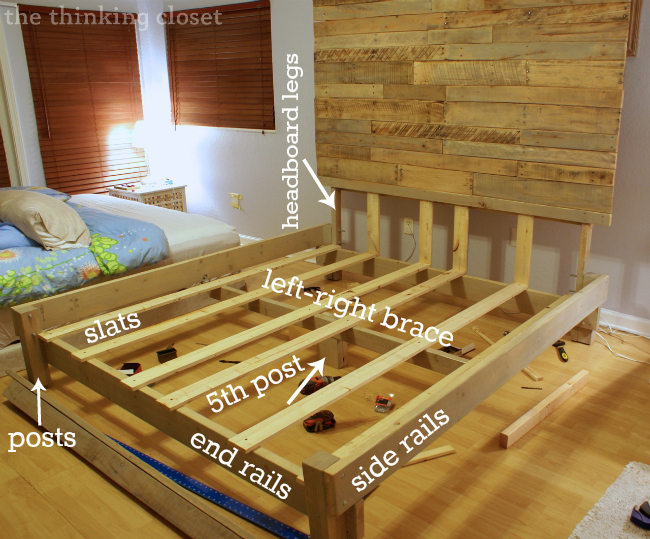
A king bed without central reinforcement becomes a hammock in six months. Start by cutting two side rails from ¾-inch plywood to your mattress length minus 1 inch. Attach 4×4 corner posts using lag bolts—not pocket holes—through the rail ends into the posts. Now the critical fix: Cut a 2×4 center support beam to span the bed’s width. Install it 12 inches from the footboard, secured with two 4-inch lag bolts through the beam into the side rails. Stand the beam upright on a 4×4 center leg cut to 7 inches shorter than your side rails. Bolt the leg to the beam and floor plate. Without this, your mattress sags and drawers jam. Test stability by standing on the frame—it should feel rock-solid with zero flex.
Installing the Ventilated Slat Platform
Skip solid plywood platforms—they trap moisture and rot mattresses. Instead, cut six 1×4 slats to your frame’s interior width. Space them 2.5 inches apart across the top, resting on the side rails and center beam. Add two ¾-inch plywood ribs screwed perpendicularly to the slats at 1/3 and 2/3 points for extra rigidity. Drill ½-inch ventilation holes every 6 inches in the ribs. This breathable design extends mattress life by 3+ years while supporting 1,000+ pounds. Check level with a 4-foot bubble level—any dip means your center leg is too short.
Constructing the Modular Drawer Cassette System
Build drawers as self-contained “cassettes” that slide into the frame—this avoids disassembling the whole bed when moving. For the lower unit, cut two ¾-inch plywood boxes (each 30″x24″x8″) for the left and right sides. Join corners with 1¼-inch pocket screws and glue. Between them, install a vertical plywood divider screwed to both boxes. For the top drawer unit, build a single wider box (60″x12″x6″) with a center divider. Crucially, make the cassette 1 inch shorter than the frame interior height so it drops in cleanly. Pre-finish all cassette parts now—reaching inside later is impossible.
Drawer Box Assembly with Precision Slide Alignment
Soft-close slides fail when misaligned by 1/16 inch. Build boxes from ½-inch plywood: sides at 7.5″ height, front/back at 23″ width. Assemble with pocket screws, ensuring perfect 90-degree corners (check with a framing square). Now the pro move: Mount slides to the cassette first, not the box. Position them so the box rides ¼ inch above the cassette floor. Test with a scrap box—open/close 10 times to confirm smooth action before attaching your real drawer. If slides bind, sand the mounting surface; never force screws. Install all eight slides for lower drawers and four for top units before proceeding.
Installing Premium Drawer Fronts Without Gaps or Gaps
Hardwood fronts hide plywood edges and elevate your build. Cut walnut or maple panels to 31″x8″ for lower fronts (adding ½-inch overhang on all sides). Sand to 220 grit. Never attach fronts directly to boxes—use ¼-inch spacers to create uniform 1/8-inch reveals. Place the drawer in the cassette, then position the front against the box. Drill two pilot holes upward through the front into the box, insert spacers, and secure with 1-inch brass screws. Adjust with shims until gaps are perfectly even. For top drawers, cut fronts to 31″x6″ with matching overhangs. This “false front” method saves hardwood and allows seasonal swaps.
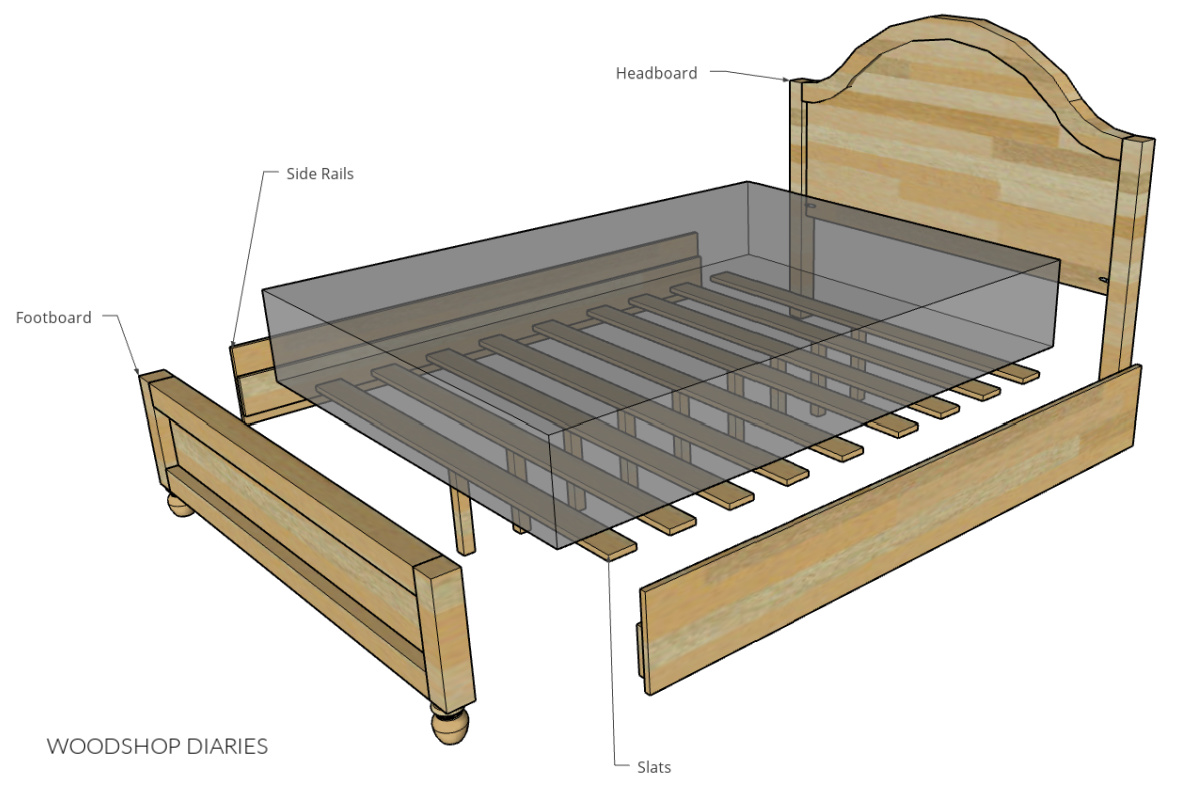
Final Assembly and Pro Finishing Techniques
Bolt the headboard/footboard to side rails using your BedLegs system—this creates knock-down capability for moving. Slide cassettes into the frame and secure with 2½-inch structural screws through the frame into cassette tops. Now the finishing secret: Sand in stages (80 → 120 → 220 grit) while parts are disassembled. On hardwood fronts, apply gel stain with a cloth (not brush) to prevent streaks. Seal with three coats of wipe-on polyurethane, sanding lightly between coats with 320 grit. On plywood edges, use iron-on veneer tape before finishing for a seamless look. This pre-assembly finishing avoids missed spots inside drawers.
Critical Hardware Upgrades That Prevent Costly Failures

Skipping these guarantees rebuilds:
– Center support leg: A 4×4 post is non-negotiable for king beds—2×4 legs bow under weight
– Slide capacity: Use 100+ lb rated slides (not 75 lb) for king-sized linen storage
– Frame connectors: BedLegs hardware costs $50 but prevents rail separation under stress
– Drawer box joints: Pocket screws alone fail; add glue and reinforce with 1×2 cleats underneath
Never substitute #8 screws for lag bolts at corner posts—they shear under pressure. Spend $20 extra on blumotion soft-close slides; they outlast standard slides by 5x and eliminate midnight drawer slams.
Avoiding the Top 3 King Bed Building Mistakes
Mistake #1: Skipping ventilation
Consequence: Moldy mattress in 8 months
Fix: Drill ½-inch holes every 6 inches in slat supports
Mistake #2: Building monolithic frames
Consequence: Can’t move through stairwells
Fix: Design as four modular sections (head/foot/sides) with bolt-on hardware
Mistake #3: Attaching fronts before slide testing
Consequence: Gaping uneven gaps when drawers bind
Fix: Install slides, test operation 20x, then attach fronts with spacers
A king-size bed frame with drawers isn’t just furniture—it’s reclaimed floor space and nightly organization. By prioritizing modular design, military-grade center support, and pre-assembly finishing, you create a storage solution that outlasts store-bought beds. Your next step? Measure your mattress today and order plywood—your clutter-free bedroom starts with that first precise cut. In six weekends, you’ll slide open smooth-gliding drawers storing everything from holiday decor to gym gear, all beneath a mattress that stays perfectly flat for years. This isn’t just how to make a king size bed frame with drawers—it’s how to build the last bed you’ll ever need.


