
Dreaming of a luxurious canopy bed but shocked by $2,000+ retail prices? You’re not alone. Most homeowners don’t realize they can craft a stunning platform canopy bed for just $300-$600 using basic tools and intermediate woodworking skills. This how to make a canopy bed frame project transforms ordinary lumber into a dramatic bedroom centerpiece with industrial accents and integrated lighting—no professional carpentry needed. In the next 1,200 words, you’ll discover exactly how to build a structurally sound queen-size frame in 10-15 hours, avoid common stability pitfalls, and customize it with professional finishes that make it look store-bought.
Gather Your Exact Lumber and Hardware for a Queen-Sized Frame
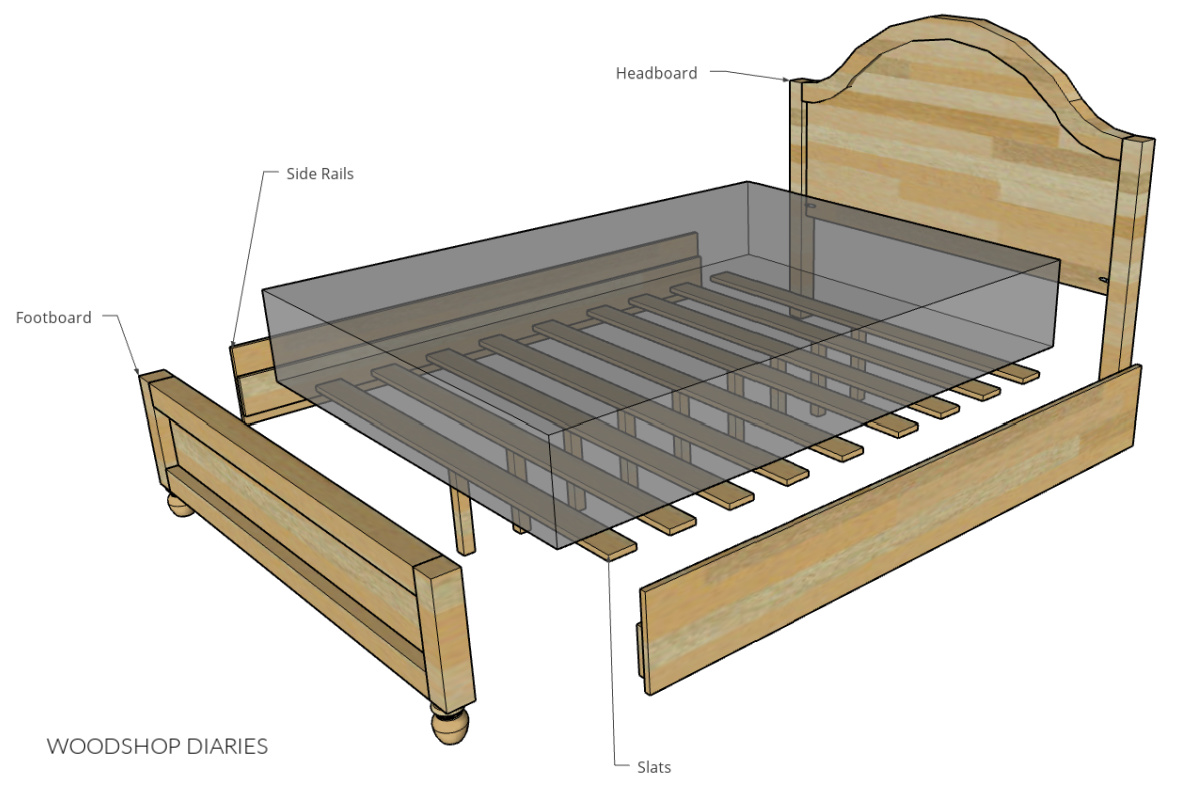
Your canopy bed’s durability hinges on precise material selection. For a standard queen mattress (60″x80″), you’ll need specific dimensional lumber quantities that prevent costly mid-project trips to the hardware store.
Critical Queen-Size Measurements
- Vertical Posts: Four 93-inch 2x4s (cut to 60-84″ final height based on ceiling clearance)
- Frame Sides: Two 80-inch 2x4s (long sides)
- Head/Footboard: Two 76-inch 2x4s (width sides) + two 54.5-inch 2x4s (end pieces)
- Internal Supports: Eight 2x4s cut to 54.5″ (spaced 12-16″ apart)
- Bed Base: 3/4″ plywood sheet or twelve 1×4 slats (16″ on center)
Must-Have Hardware Checklist
Twelve 1/4″ x 3″ hex bolts with matching washers and nuts form the bed’s structural backbone—never substitute smaller fasteners. Add wood glue for joint reinforcement and 3″ structural screws for frame assembly. For industrial pipe accents, include 1/2″ galvanized floor flanges and pipe thread sealant to eliminate squeaks.
Pro-Tip: Buy 10% extra lumber for mistake buffer. Pine 2x4s cost $3-$5 per 8-foot board at big-box stores—factor in sandpaper and finish costs when budgeting.
Prepare Essential Power Tools for Precision Bed Construction
Skip this step and you’ll fight wobbling posts and misaligned frames. These seven tools make or break your canopy bed’s professional finish.
Non-Negotiable Tool Requirements
- Cordless Drill/Driver: With 1/4″ drill bit for bolt holes and #8 driver bit
- Miter Saw: For clean 90° crosscuts (circular saw works with speed square guide)
- 4-Foot Level: Checks post plumb and frame level simultaneously
- Carpenter’s Square: Verifies perfect 90° joints during assembly
- Clamps: Four 24″ bar clamps hold frames square while bolting
- Orbital Sander: With 80/120/220-grit paper for glass-smooth finishes
- Socket Wrench Set: Tightens hex bolts without stripping nuts
Critical Safety Note: Always wear safety glasses when cutting lumber and respirator during sanding. Clamp workpieces securely—never hold wood with your hands during saw operations.
Build a Rock-Solid Rectangular Bed Frame in 4 Steps
Your canopy bed will collapse without this foundational step. Follow this sequence to create a warp-free base that supports 500+ pounds.
Step 1: Assemble the Outer Rectangle
Lay two 80-inch and two 76-inch 2x4s on a flat surface to form the frame perimeter. Drill 1/8″ pilot holes through corner pieces into post ends, then drive 3″ structural screws with wood glue. Measure diagonally corner-to-corner—adjust until both measurements match exactly for perfect squareness.
Step 2: Install Cross Supports
Position eight 54.5″ 2x4s inside the frame spaced 12-16″ apart. Clamp each support perpendicular to the outer frame, drill pilot holes, and secure with 3″ screws. This grid prevents mattress sagging—skip this and your box spring will bow within weeks.
Step 3: Add Plywood or Slatted Base
Attach 3/4″ plywood directly to the support grid using 1.5″ screws every 8 inches. For slatted bases, space twelve 1x4s 16″ apart and screw through the frame bottom. Warning: Never use thin plywood—3/4″ minimum prevents flexing under weight.
Troubleshooting Tip: If the frame wobbles, check diagonal measurements again. Uneven floors require adjustable furniture feet—attach them after final assembly.
Cut and Secure 80-Inch Canopy Posts Without Wobble
Most DIY canopy beds fail here—leaning posts ruin aesthetics and safety. These techniques ensure vertical perfection.
Precise Post Installation Method
Cut four 93″ 2x4s to your final height (80″ for dramatic effect, 60″ for low-profile). Position one post at each frame corner, then clamp a 4-foot level vertically against two adjacent sides. Drill 1/4″ clearance holes through the frame top into the post center, insert hex bolts with washers, and tighten nuts incrementally while rechecking plumb.
Stability Reinforcement Hack
Screw 6″ triangular 2×4 gussets between each post and frame using 2.5″ screws. This “corner brace” technique—common in deck construction—eliminates post sway. Key visual cue: Gaps between post and frame indicate loose bolts—re-tighten immediately.
Construct the Top Canopy Frame for Draping or Lighting
This is where your bed transforms from basic to breathtaking. The canopy frame must handle fabric weight or lighting hardware without sagging.
Two Frame Design Options
- Full Enclosure Frame: Cut two 80″ and two 54.5″ 2x4s to connect all four posts at the top. Secure with 1/4″ hex bolts through post centers.
- Minimalist Head/Foot Frame: Install only 80″ crosspieces at head and foot posts for an open feel—ideal for low ceilings.
Pro Installation Trick: Pre-drill bolt holes at the exact center of post tops. Offset holes cause frame twisting—measure twice before drilling. For lighting integration, rout a 1/2″ channel along the frame underside to hide LED strips.
Apply a Professional Finish That Prevents Splinters
Skipping proper finishing turns your masterpiece into a splinter hazard. This three-phase process delivers furniture-grade results.
Sanding Sequence for Glass-Smooth Wood
- Rough Sand: 80-grit removes saw marks (focus on end grain)
- Medium Sand: 120-grit eliminates scratches from previous step
- Final Sand: 220-grit with the wood grain for silky texture
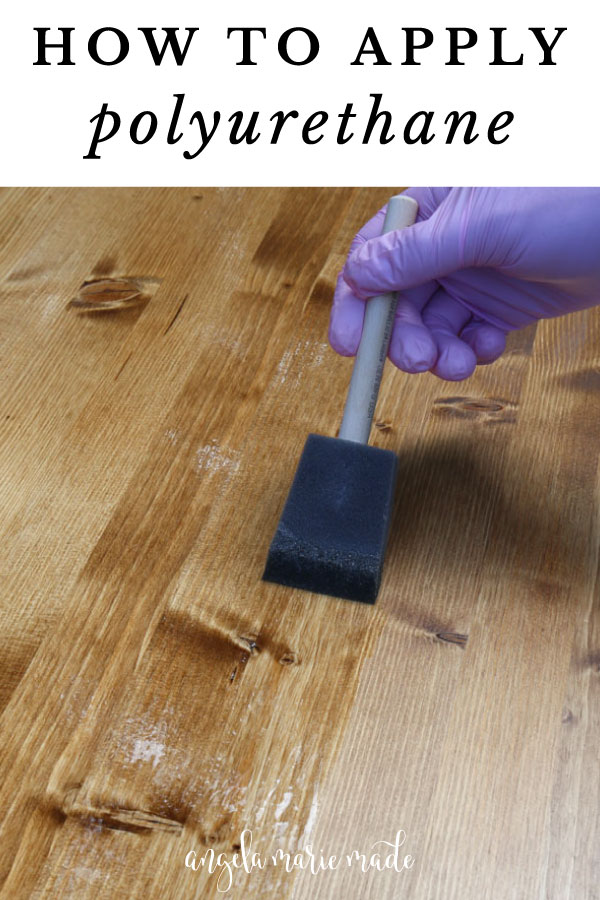
Finish Application Protocol
Apply sanding sealer to end grain first, then wipe on pre-stain wood conditioner. After 15 minutes, apply your chosen finish:
* Stain + Polyurethane: 2 coats stain, 3 coats poly with 220-grit sanding between
* Paint: High-hide primer + two cabinet-grade paint coats
* Whitewash: Mix 1:1 white paint/water, wipe excess immediately
Critical Timing: Allow 24 hours between finish coats. Rushing causes sticky surfaces—your bed frame must cure 48 hours before assembly.
Install Hidden LED Lighting Without Electrical Risks
Transform your canopy into a mood-setting feature with safe, integrated lighting.
Three Foolproof Lighting Methods
- Ambient Glow: Adhesive LED strips hidden in routed frame channels (use dimmable 3000K strips)
- Reading Lights: Low-voltage puck lights mounted under crosspieces (position 24″ above mattress)
- Drapery Accents: Rope lighting clipped to fabric headers
Safety Imperative: Run all wiring through conduit inside posts to wall outlets. Never splice wires yourself—hire an electrician for final connections. Test lighting before final assembly.
Avoid These 3 Critical Stability Mistakes During Assembly
Most DIY canopy beds wobble due to preventable errors. Sidestep these professional pitfalls.
Mistake #1: Skipping Corner Braces
Without triangular gussets at post bases, lateral movement develops within months. Fix: Install 6″x6″ plywood gussets at all four corners using 2.5″ screws.
Mistake #2: Uneven Floor Compensation
Leveling only the frame base causes post stress. Solution: Attach adjustable furniture feet to post bottoms—level the entire structure after final assembly.
Mistake #3: Rushed Bolt Tightening
Overtightening strips nuts; undertightening causes wobble. Technique: Tighten hex bolts to “hand-tight plus 1/4 turn” with socket wrench, then recheck after 24 hours.
Customize Your Bed with Distressed Finishes or Upholstery
Make your canopy bed uniquely yours with these designer-approved upgrades.
Two Weekend-Ready Customizations
- Distressed Wood Effect: Apply dark stain, let dry 4 hours, then sand edges heavily. Wipe on gray glaze for vintage character.
- Industrial Pipe Headboard: Attach 1/2″ galvanized pipes between front posts using floor flanges—perfect for hanging quilts.
Time-Saver: Use pre-cut 4×8 plywood for headboards. Attach with pocket holes for invisible joinery—no exposed screws.
Final Assembly Checklist Before adding your mattress:
1. Re-tighten all hex bolts with socket wrench
2. Verify posts are plumb with 4-foot level
3. Confirm frame diagonals match within 1/8″
4. Test weight capacity with stacked books
Your custom canopy bed frame will become the envy of every guest—especially when they learn you built it for under $600. To maintain its showroom look, tighten bolts quarterly and touch up scratches with matching stain pens. Ready to drape your masterpiece? Next, explore how to hang canopy bed curtains without drilling for removable fabric installations. The true luxury isn’t in the price tag—it’s in knowing you crafted this statement piece with your own hands.


