
That ornate iron bed frame gathering dust in your garage or marked for the scrap heap holds untapped potential. Thousands of beautifully crafted vintage frames end up in landfills yearly when they could become stunning outdoor benches. Learning how to make a bench from an iron bed frame solves two problems at once: rescuing architectural history and creating functional garden furniture. This guide cuts through the guesswork with a battle-tested method for converting rusty relics into heirloom-quality seating. You’ll discover exactly how to reinforce weak spots, choose weatherproof materials, and finish your bench for decades of use—no welding required.
Your Iron Bed Frame Bench Toolkit: No Guesswork on Supplies
Skip the hardware store trips with this exact shopping list. Every item serves a critical purpose in your iron bed frame transformation.
- The Frame: One complete iron or steel bed frame with decorative headboard and footboard. Scrollwork patterns (heart-shaped designs are popular but not essential) provide visual interest. Avoid frames with deep rust pits compromising structural integrity.
- Seat Wood: 8-10 feet of outdoor-rated lumber. Reclaimed barn wood delivers instant patina, while cedar or cypress resists rot naturally. For pressure-treated pine, allow 30 days to dry before finishing.
- Critical Support Frame: Two 8-foot exterior-grade 2x4s (for internal seat structure—non-negotiable for safety).
- Hardware That Won’t Fail:
- 1/4″ x 3″ lag bolts with large washers (metal-to-wood connections)
- 2.5″ and 3″ exterior deck screws (wood assembly)
- 1/4″ machine screws, nuts, and washers (metal-to-metal joins)
- Finishing Arsenal: Rust converter (if needed), metal primer, exterior spray paint, and spar urethane (not regular polyurethane—this marine-grade sealant withstands UV damage).
- Non-Negotiable Safety Gear: Work gloves, safety glasses, and a N95 respirator for sanding/painting.
Why These Exact Materials Matter
Using indoor lumber or interior paint guarantees rapid deterioration. Pressure-treated pine must cure outdoors for a month—otherwise trapped chemicals prevent proper sealing. Spar urethane’s flexibility accommodates wood movement during temperature swings, unlike brittle deck sealers that crack. Skipping large washers under lag bolts causes wood splitting under weight.
Deconstructing Your Iron Bed Frame Without Damage
How to Safely Separate Headboard and Footboard
Begin by laying the frame flat on cardboard or plywood (protects finishes). Locate all connection points—typically bolts at the headboard/footboard joints with side rails. Apply penetrating oil to seized nuts 24 hours before starting. Using a socket wrench (not pliers), turn counterclockwise while applying firm downward pressure. If bolts spin freely but won’t release, tap the bolt head upward with a hammer to dislodge it from the rail. For welded joints, mark cut lines 2 inches from the headboard base using a soapstone pencil—this preserves decorative elements.
Critical Warning: Never force rusted bolts with excessive leverage. If a bolt shears, drill it out using a left-handed drill bit before attempting extraction. Metal fatigue cracks around joints mean the frame is unsafe for seating—discard immediately.
Cleaning and Rust Treatment Protocol
Scrub all metal with a stiff nylon brush and TSP solution. For surface rust, use a wire wheel attachment on a drill at low speed (high speed generates heat that warps thin metal). Deep pitting requires chemical treatment: Apply rust converter liberally, wait 20 minutes until it turns gel-black, then wipe excess. Sand only to 120-grit—over-sanding exposes fresh metal to immediate re-rusting. Wipe final surfaces with acetone on a lint-free cloth; fingerprints prevent paint adhesion.
Building the Seat Frame That Actually Supports Weight
Why Your Bench Will Collapse Without This Step
Original bed frames distribute weight along long side rails—not concentrated downward force like seating requires. Skipping the internal wood frame creates dangerous flex points. This 15-minute reinforcement prevents catastrophic failure.
Step-by-Step Seat Frame Construction
- Measure Precisely: Place footboard and headboard upright 18 inches apart (standard seat depth). Measure inside width at the top rail. Subtract 1/2 inch for wood expansion.
- Cut Support Rails: Rip two 2x4s to your measured width. These become front/back seat supports.
- Position and Secure: Center supports 2 inches below the top rail on both footboard and headboard. Clamp in place. Drill 1/8″ pilot holes through metal rails into wood. Drive 3″ lag bolts with large washers—never use screws here.
- Add Cross Braces (For Wide Benches): If seat exceeds 42 inches wide, install a center 2×4 brace perpendicular to supports. Bolt through headboard/footboard center posts.
Pro Tip: Place a level across supports before final tightening. A 1/4-inch slope toward the front prevents water pooling.
Attaching Seat Slats for Drainage and Durability

Cutting and Spacing Your Wood Perfectly
Use a circular saw with a carbide-tipped blade for clean cuts on reclaimed wood. Cut slats to match your frame width plus 1.5 inches total overhang (3/4″ per side). Space slats 1/4 inch apart using a nail as a spacer—this gap allows rainwater drainage and accommodates seasonal wood expansion. Never butt joints tightly; trapped moisture causes rot.
Securing Slats Without Visible Hardware
For a clean look: Drill pocket holes underneath each slat using a 15-degree jig. Attach to the 2×4 support frame with 2.5″ exterior deck screws. For rustic charm: Use 3″ offset deck screws driven at 45-degree angles through slats into supports (pre-drill holes to prevent splitting). Always countersink screw heads 1/8 inch below wood surface.
Critical Mistake to Avoid: Attaching slats directly to the metal frame. Thermal expansion causes metal to “walk” screws loose over time. The wood-on-wood connection absorbs movement.
Finishing Techniques That Last 10+ Years Outdoors
Metal Painting Sequence for Rust Prevention
- Spray light coat of self-etching metal primer within 1 hour of sanding
- Wait 2 hours, then apply first color coat (hold can 10 inches away in 15-second bursts)
- Sand lightly with 220-grit after 24 hours, wipe clean
- Apply second color coat
- After 48 hours, seal with clear matte metal topcoat (optional but recommended for high-sun areas)
Why This Works: Self-etching primer chemically bonds to metal. Sanding between coats eliminates “orange peel” texture that traps moisture.
Wood Sealing That Beats Rain and UV Rays
Sand wood to 150-grit before finishing. Apply spar urethane with a 2-inch foam brush in thin, even coats—never thick globs that pool. Allow 12 hours between coats. For maximum protection: Mix 1 part boiled linseed oil with 3 parts spar urethane for the first coat (enhances wood penetration).
Seasonal Maintenance: Reapply spar urethane every spring. Test by sprinkling water—if it beads, protection remains. If absorbed, recoat immediately.
Troubleshooting Common Bench Failures
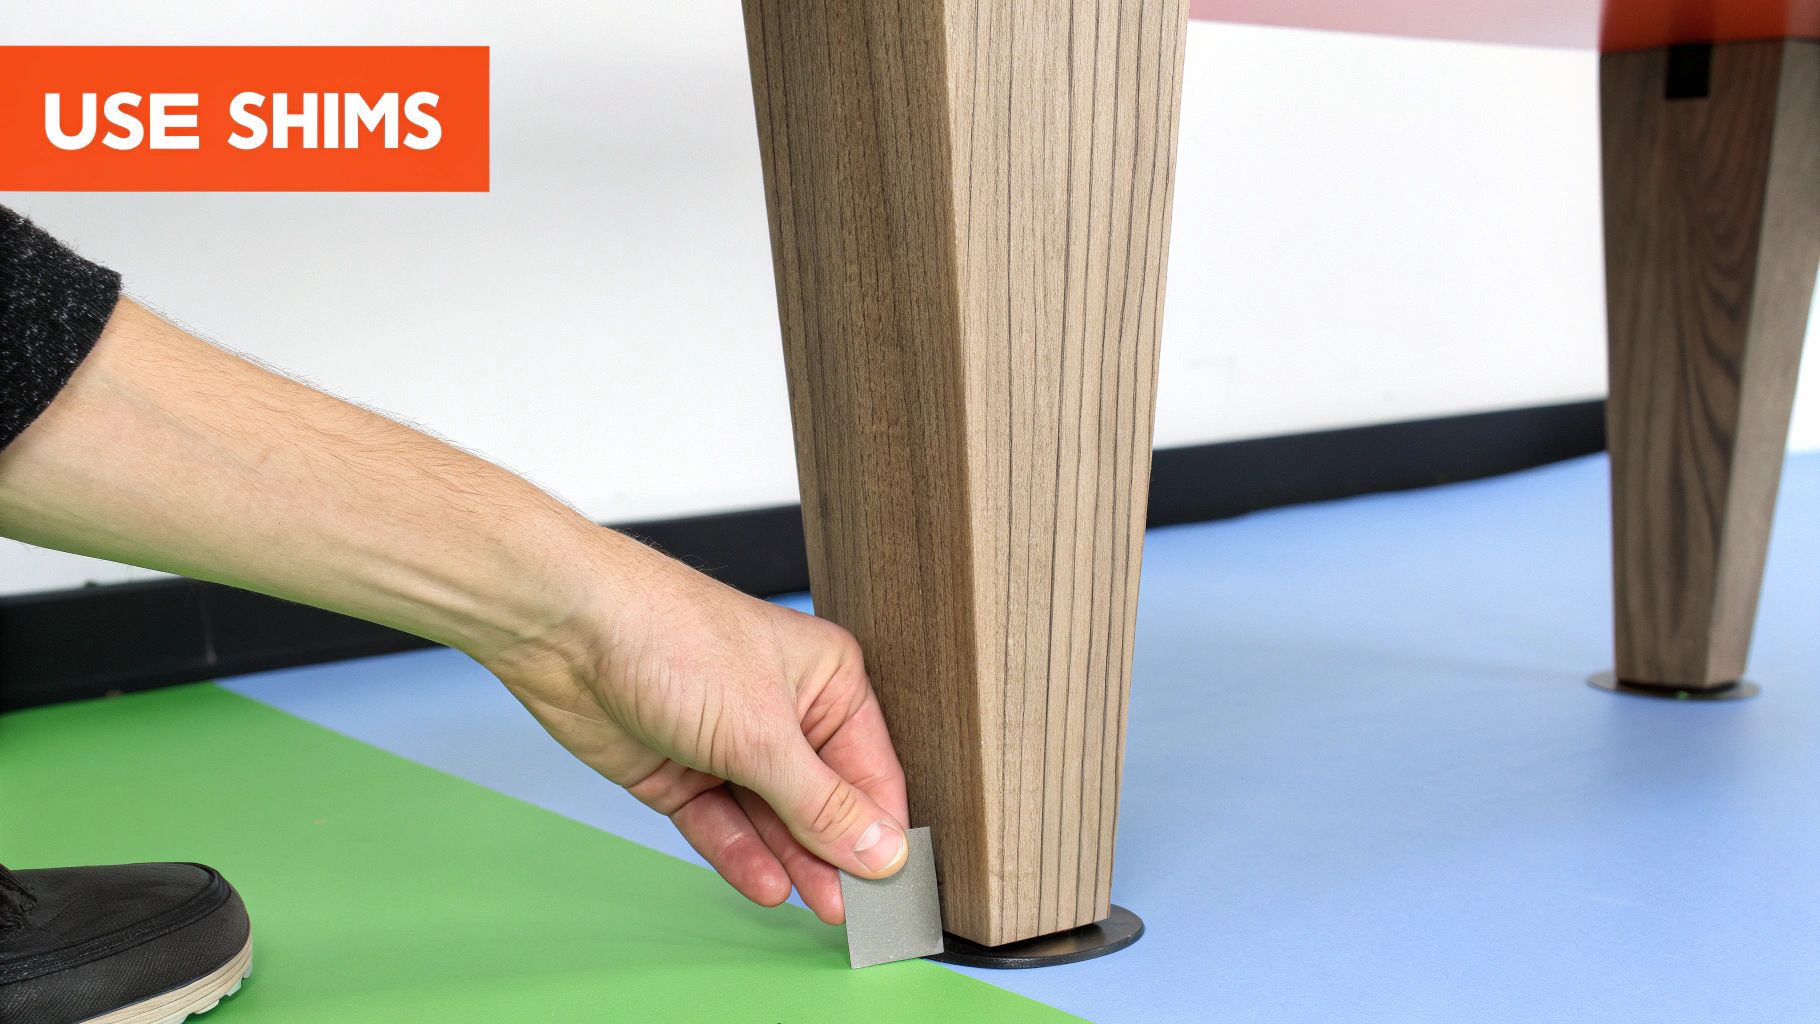
Why Your Bench Rocks (And the 2-Minute Fix)
Uneven ground isn’t the culprit 80% of the time. More often, the headboard or footboard posts are slightly bent from deconstruction. Place a level across the top rail. If uneven, loosen the lag bolts on the lower side, insert a plastic furniture shim between metal and wood, then re-tighten. Never trim metal legs—this weakens the structure.
Preventing Seat Squeaks in Windy Conditions
Metal-on-wood vibrations cause annoying noises. Before final assembly, rub candle wax or bar soap on all bolt threads where metal contacts wood. The lubricant allows micro-movement without friction noise while maintaining structural integrity.
Stopping Rust at Connection Points
Water seeps through bolt holes over time. After assembly, dab exterior-grade silicone caulk around every bolt head where metal meets wood. Paint over it—this creates a waterproof seal without visible residue.
Customizing Your Bench Beyond Basic Function
Adding Back Support Without Welding
If your headboard is under 18 inches tall, create a supportive backrest: Cut two 1×4 cedar boards to seat width. Angle the top 15 degrees using a miter saw. Attach to headboard posts with 3″ lag bolts through the back of the posts—never front-facing where bolts compromise aesthetics. Space boards 2 inches apart for breathability.
Creating a Garden Focal Point
Paint the metal frame in bold colors like deep emerald or terracotta using automotive-grade spray paint. For the wood seat, try a “dry brush” technique: Dip a stiff brush in white paint, wipe 90% off, then lightly drag across wood grain for a weathered look. Add climbing vine anchors by screwing eye hooks into the headboard top.
Final Safety and Longevity Checklist
Before placing cushions, verify:
– All lag bolts are tightened to 25 ft-lbs (use a torque wrench—hand-tight isn’t enough)
– No wood cracks within 2 inches of fasteners
– Spar urethane coats show no brush marks or thin spots
– Bench supports 300+ pounds without flex (test with sandbags)
Place your finished bench on level ground away from sprinkler systems. For coastal climates, add a sacrificial zinc anode bolted to the frame—it corrodes first, protecting the main structure. With proper care, your repurposed iron bed frame bench will become a garden legacy piece outlasting decades of store-bought furniture. The key was building that hidden 2×4 support frame—now you’ve turned scrap into heirloom.


