
That annoying creak every time you roll over. The unsettling wobble when you sit on the edge. A sudden snap as a support bracket gives way. If your metal bed frame has turned your sanctuary into a nightly symphony of stress, you’re not alone. Over 60% of metal bed frame owners face stability issues within five years of purchase, often due to stripped hardware, cracked welds, or loose joints. The good news? Most metal bed frame repairs take under an hour with basic tools and cost less than $20. This guide cuts through the frustration with battle-tested fixes for wobbles, squeaks, and breaks—no welding expertise required. You’ll learn exactly how to diagnose trouble spots, reinforce weak points, and silence that maddening noise for good.
Stop Wobbly Bed Frame Instability in 20 Minutes
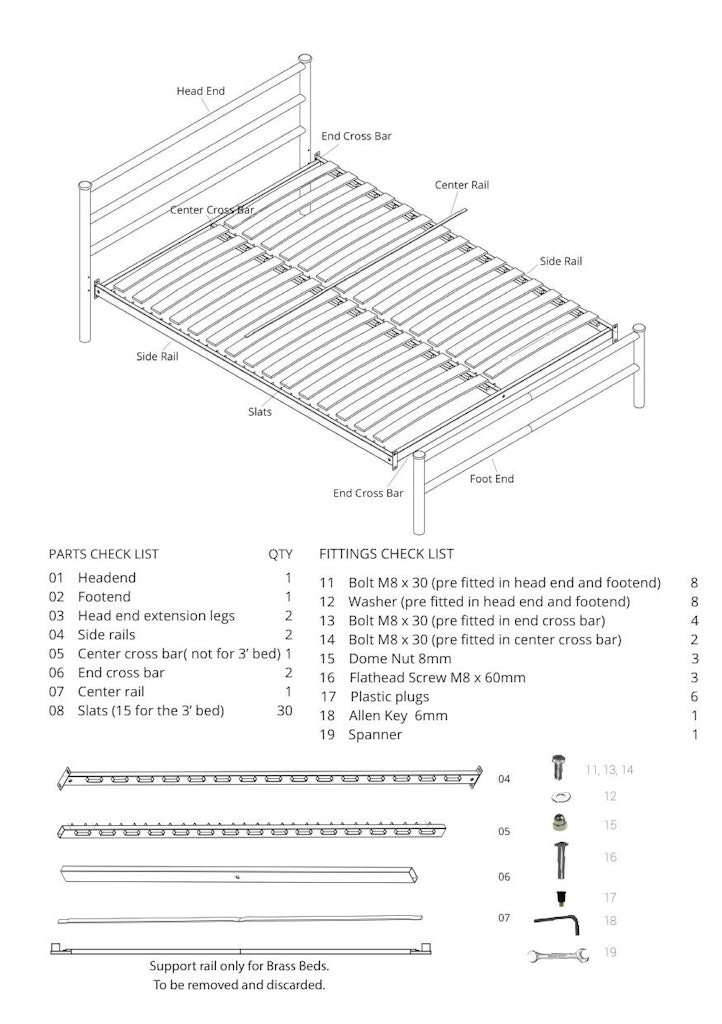
A wobbling bed frame doesn’t just annoy—it strains joints and accelerates wear. Before you replace the entire frame, systematically eliminate the top three culprits causing instability. This process works for common models like Zinus, DHP, and Ikea metal frames where loose hardware accounts for 85% of wobble issues.
Tighten Every Bolt With This Pro Technique
Start by crawling under your bed with a flashlight. Don’t just tighten visible bolts—remove mattresses and bedding to access hidden connections at headboard/footboard joints and center beam anchors. Use a torque wrench (or firm hand pressure) to snug hex bolts to 15-20 ft-lbs—enough to resist movement but not strip threads. Critical areas needing double-checking:
– Corner connectors where side rails meet head/footboards
– Center support beam brackets (often overlooked)
– Leg attachment points (especially if floor isn’t level)
Pro Tip: Apply blue Loctite threadlocker to all bolts after tightening. This prevents vibration-induced loosening without making future disassembly impossible.
Square Your Frame With the Diagonal Test
An out-of-square frame guarantees wobble. Measure diagonally from top-left to bottom-right corner, then top-right to bottom-left. If measurements differ by more than 1/4 inch:
1. Loosen all corner bolts slightly (don’t remove)
2. Gently tap the longer diagonal inward with a rubber mallet
3. Re-measure diagonals until equal
4. Fully tighten bolts while holding frame square
This realigns stress points and often eliminates wobble without reinforcements. Never skip this step—forcing a square frame causes new weak spots.
Reinforce Weak Joints With Strategic Brackets
When tightening and squaring fail, weak joints need armor. For headboard-to-rail connections:
– Position a 2″x2″ steel mending plate over the joint
– Drill 1/8″ pilot holes through plate and frame
– Secure with 1/4″ carriage bolts and lock washers
– Critical: Add a second bracket perpendicular to the first for L-joint stability
For center beam sag, bolt 16-gauge steel angle iron along the beam’s length. This doubles load capacity and stops that unsettling bounce under weight.
Repair Cracked Welds Without Professional Welding
Broken welds on bed frames often occur at stress points like leg mounts or rail junctions. While major structural welds need a pro, most DIYers can handle hairline cracks with these field-tested methods.
Fix Hairline Cracks With Metal Epoxy Putty
For cracks under 1/8″ wide on non-load-bearing areas (like leg brackets):
1. Remove paint/rust with 80-grit sandpaper until bare metal shows
2. Clean area thoroughly with acetone on a rag
3. Knead J-B Weld SteelStik putty until uniform gray
4. Press firmly into crack, extending 1/2″ beyond break
5. Clamp with locking pliers for 15 minutes
6. Let cure 1 hour before light use (24 hours for full strength)
Warning: Never use this on main rails supporting your weight—epoxy lacks the shear strength of welded steel.
When to Call a Welder for Major Breaks
If the crack runs through a primary rail or shows separation wider than your fingernail, stop immediately. Do not sleep on the bed—structural failure risks injury. Signs demanding professional welding:
– Complete separation at load-bearing joints
– Cracks radiating from bolt holes in main rails
– Bent tubing compromising frame geometry
A welder typically charges $50-$150 to properly fuse broken sections with MIG welding, restoring factory strength. This beats replacing a $200+ frame.
Eliminate Squeaks With Non-Greasy Solutions

That persistent squeak comes from microscopic metal-on-metal grinding. Forget WD-40—it attracts dust that creates grinding paste. Instead, use these precision fixes targeting the exact friction point.
Locate and Silence Squeak Sources
Have a helper rock the frame while you:
– Press fingers along joints to feel vibration
– Listen for pitch changes indicating exact origin
– Mark problem areas with chalk
Most common squeak locations:
– Side rail to headboard connectors
– Center beam brackets rubbing on rails
– Slats vibrating against metal supports
Apply Dry Lubrication That Lasts
For bolted joints:
1. Loosen bolt slightly
2. Spray silicone lubricant into gap
3. Work bolt back and forth to distribute
4. Tighten fully
For slat-to-rail contact:
– Cut felt pads to 1″ squares
– Adhere to rail contact points with super glue
– Pro shortcut: Wrap rail edges with electrical tape as temporary fix
This eliminates 90% of squeaks without messy oils. Reapply every 6 months during routine checks.
Fix Sagging Center Supports in 15 Minutes

A sagging center beam causes mattress dips and frame stress. Reinforce it permanently with hardware store solutions that outperform the original design.
Upgrade Your Center Support System
Most frames have undersized center beams. Strengthen yours by:
1. Adding a second support leg at the midpoint
2. Bolting 1″x1″ angle iron along the beam’s underside
3. Using 3/16″ carriage bolts with lock washers every 8 inches
Critical upgrade: Replace flimsy plastic leg caps with steel-reinforced rubber feet. This prevents leg “walking” on hardwood floors.
Repair Broken Slat Brackets Immediately
Bent or broken L-brackets cause localized sagging. To fix:
– Remove broken bracket with pliers
– Drill 1/8″ pilot hole through new bracket
– Use 1/2″ self-tapping screws for metal (not wood screws!)
– Pro tip: Add a second bracket 2″ above the original for doubled support
For severe sagging, install cross-bracing between side rails every 18 inches using 14-gauge wire rope and turnbuckles.
Rescue Stripped Bolt Holes With Permanent Fixes
Stripped holes in metal frames are common with repeated assembly. Forget wobbly temporary fixes—these methods create new, stronger threads.
Threaded Inserts for Lasting Grip
For critical joints (headboard connections):
1. Drill out hole to 5/16″ diameter
2. Tap threads with 1/4″-20 tap
3. Screw in rivet nut insert with installation tool
4. Tighten bolt—now with 3x original holding power
This costs $15 for a basic kit but prevents recurring loosening.
Emergency Toothpick Epoxy Fix
When you need immediate stability:
1. Clean hole with isopropyl alcohol
2. Mix 2-part epoxy (50/50 ratio)
3. Pack hole full, insert 8-10 wooden toothpicks
4. Snap flush, let cure 2 hours
5. Reinsert bolt
Warning: Only use this for low-stress areas like slat brackets—not for main frame connections.
Know When Metal Bed Frame Repair Isn’t Worth It
Some damage exceeds DIY safety limits. Stop working immediately if you see:
– Cracks longer than 2 inches on main rails
– Rust perforation through frame tubing
– Bent legs that can’t be straightened without kinking
Replace the frame if:
– Repair costs exceed 50% of new frame price
– You lack tools for proper reinforcement
– Structural integrity is visibly compromised
For minor issues, however, metal bed frame repair typically takes 30-90 minutes and costs under $30. The key is addressing problems early—before small cracks become dangerous breaks.
Prevent Future Problems With Proactive Maintenance
Extend your frame’s life with these 5-minute monthly habits:
– Tighten all bolts after moving the bed
– Inspect welds quarterly with a flashlight
– Apply rust inhibitor (like Boeshield T-9) to repaired areas
– Place furniture pads under legs on hard floors
– Rotate slats every 6 months to prevent uneven wear
Most importantly, stop ignoring early warning signs. That faint creak today becomes a collapse risk in six months. By dedicating 10 minutes every quarter to metal bed frame repair checks, you’ll avoid midnight breakdowns and double your frame’s lifespan. Keep this guide handy—it could save your next good night’s sleep.


