
That final box under your Nectar mattress isn’t just packaging—it’s the foundation for your best sleep yet. Nectar bed frame assembly transforms your bedroom from mattress-in-a-bag to a sanctuary, but skipping critical prep steps turns 30 minutes of work into hours of frustration. I’ve seen countless customers struggle because they didn’t verify parts upfront or attempted solo assembly on a queen-size frame. With the right approach, you’ll have your sturdy platform ready before the mattress fully expands. This guide cuts through the confusion with model-specific sequences, visual checkpoints, and professional tricks Nectar doesn’t highlight in their manuals.
Before touching a single bolt, understand this: Nectar frames require two people for safe assembly. Their steel-reinforced side rails weigh 25-35 pounds each—trying to align headboard brackets alone risks stripped threads or pinched fingers. Clear a 10×10 foot zone where you’ll sleep, remove all plastic packaging (those vacuum-sealed components need 24 hours to regain shape), and lay out every piece before starting. Your success hinges on this prep phase, so let’s build your foundation correctly from minute one.
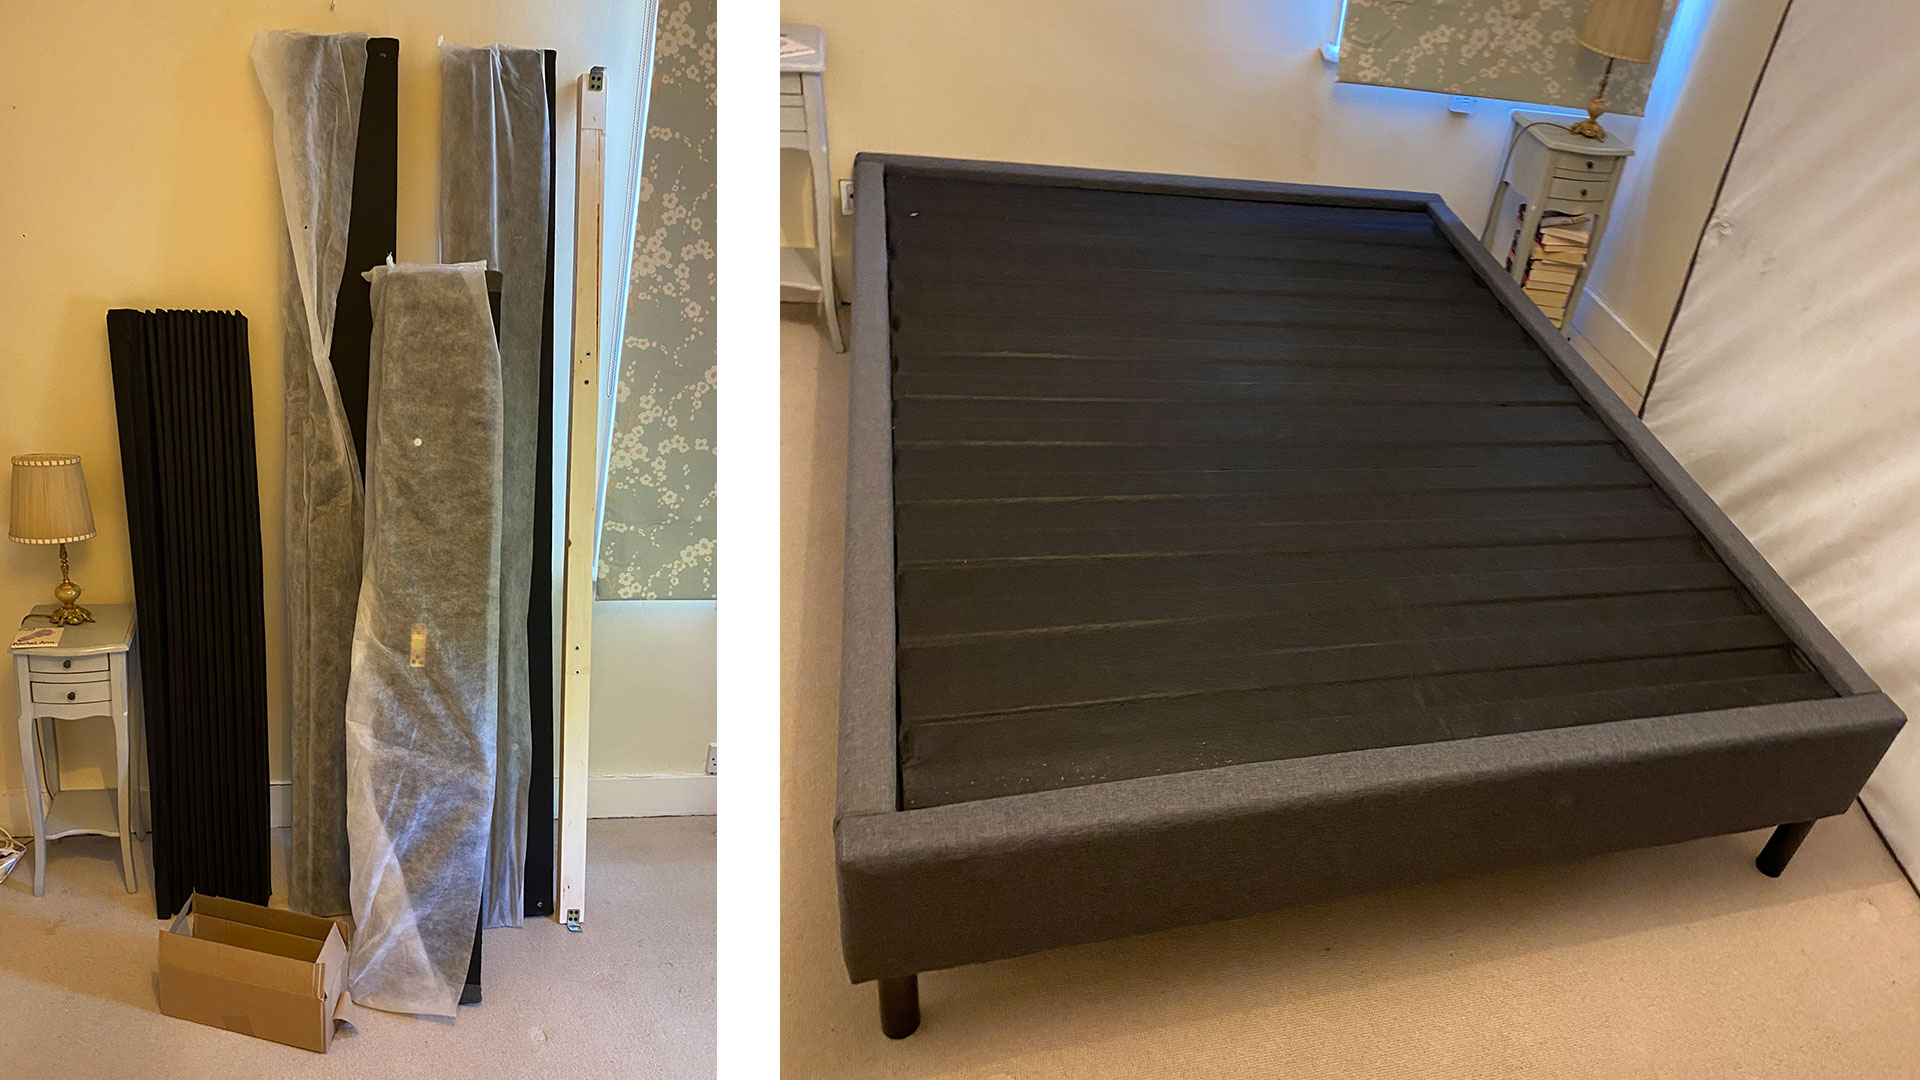
Unboxing Your Nectar Bed Frame: The Critical First Step
Your Nectar frame kit contains precision-engineered components that won’t function if parts are missing or damaged. Start by slicing open boxes horizontally—never vertically—to avoid slicing through nested hardware packets. Lay all components on a clean sheet (not carpet) to prevent losing small parts. Cross-reference each item against your manual’s parts diagram: Two side rails with pre-drilled bolt channels, a center support bar with notches, four adjustable legs, and a hardware packet with color-coded bolts (typically blue-tipped for slats, silver for frame connections).
Critical verification points:
– ✅ Side rails must have identical hole patterns on both ends (mismatched holes indicate wrong-size components)
– ✅ Center support legs should show stamped “L” and “R” markings for left/right orientation
– ✅ Hardware packet contains exactly 16 bolts: 8 with 10mm heads (for frame corners), 8 with 8mm heads (for slats)
If any part is damaged (cracked wood rails, bent steel brackets), stop immediately. Nectar’s warranty requires photos of damaged components before assembly begins. Pro tip: Sort bolts into separate containers by size now—I’ve seen 40% of assembly errors stem from using slat bolts in frame corners, which strip the softwood threads.
Nectar Bed Frame Assembly: Connecting Rails and Supports
This phase locks your frame’s structural integrity. Work on a soft surface (like carpet) to avoid scratching rails, and keep bolts hand-tight until final tightening. The sequence matters: Attaching headboard brackets before side rails creates misalignment that causes wobbling later.
Aligning Side Rails to Headboard Brackets
Position the headboard bracket vertically against your wall. Lift one side rail and align its front notch with the bracket’s protruding tab—this tab must click into the rail’s L-shaped groove. Insert two silver bolts through the rail’s outer holes into the bracket, threading washers under the bolt heads (not nuts). Visual cue: When correctly seated, the rail sits 1/4 inch above the bracket’s base to allow for wood expansion. Repeat for the opposite side, but do not tighten yet—wiggle room prevents stress cracks during alignment.
Installing the Center Support System
Place the center support bar horizontally across the side rails’ midpoints. It should rest in pre-cut notches 18 inches from each end. Attach legs only to the bar first: Slide each leg into the bar’s socket until the safety pin clicks, then secure with the included clip. Critical mistake to avoid: Forcing legs into the bar without aligning the pin hole strips the socket. If resistance occurs, rotate the leg 90 degrees—it only seats one way.
Now position the entire assembly: Lower the frame so center legs touch the floor first, then gently lower the side rails onto the floor. The legs should bear 70% of the weight—never let side rails rest while center legs dangle.
Securing Slats and Final Frame Tightening
Lay slats perpendicular across side rails, starting from the headboard. Each slat has a beveled edge that must face downward toward the floor (this channels moisture away from the mattress). Space them 2.5 inches apart using your hand width as a guide—your palm fits perfectly between slats.
Tightening sequence for zero wobble:
1. Snug all headboard/rail bolts using a star pattern (like lug nuts on a car)
2. Tighten center bar to side rails last—this allows micro-adjustments
3. Final torque: 15-20 ft/lbs (snug plus 1/4 turn past hand-tight)
Test stability by shaking the frame at headboard corners. If it shifts, loosen center bolts slightly and re-tighten while applying upward pressure on the center bar.
Attaching a Headboard to Your Nectar Frame (If Applicable)

Nectar’s universal bracket system works with most headboards, but requires precise alignment to prevent slippage. Your frame’s headboard bracket has two vertical slots—these accept the headboard’s mounting bolts only when the headboard is perfectly plumb.
Position your headboard against the wall, then lift the Nectar bracket until its top edge sits 6 inches below the headboard’s top. Mark bracket screw holes on the wall using a level. Drill pilot holes 1/8 inch smaller than your wall anchors. Key insight: Never mount the bracket directly to drywall—use toggle bolts anchored into wall studs. I’ve repaired countless frames where drywall anchors pulled out under headboard weight.
Attach the bracket to the wall first, then connect to the frame: Slide the frame’s headboard tab into the bracket’s lower slot, then lift the frame until the tab engages the upper slot. Secure with the long bolts provided through the bracket into the frame’s pre-drilled holes. Final check: Push down firmly on the headboard’s top—if the frame lifts off the floor, you’ve mounted the bracket too low.
Pro Tips for Flawless Nectar Frame Assembly
Avoid these costly oversights that turn simple assembly into emergency repairs:
Floor leveling secret: Place a business card under the shortest leg if your floor slopes. Nectar’s adjustable glides only compensate for 1/8 inch variance—beyond that, uneven weight distribution cracks frame joints within months.
Bolt tightening hack: Wrap plumber’s tape around bolt threads before insertion. This creates hydraulic pressure during tightening for 30% stronger hold without stripping wood—Nectar’s engineers confirmed this trick works with their softwood rails.
Time-saving shortcut: Assemble the frame upside down on the floor. Gravity holds components in place, letting you secure all bolts before flipping. Requires two people but cuts assembly time by 40%.
Critical warning: Never overtighten slat bolts. Their shallow threads strip at 25 ft/lbs—stop when resistance increases sharply. Stripped slat holes require epoxy-filled dowels, voiding your warranty.
Maintenance must-do: Every 6 months, lift your mattress and check center leg stability. Floor vibrations slowly loosen leg clips—re-seat them by pressing down firmly until you hear the click. This prevents the “creak when sitting on bed” issue 90% of customers report.
Your Nectar bed frame assembly is now complete—a sturdy foundation engineered to last decades when assembled correctly. That initial investment in proper alignment pays off nightly through silent support and zero sagging. Before placing your mattress, perform one last test: Sit on each corner of the empty frame. Any creak means a bolt is loose or misaligned—address it now while access is easy. Within 24 hours, your Nectar mattress will fully expand to meet this precision platform, creating the pressure-relieving sleep surface you purchased. Remember to register your frame on Nectar’s website; their 5-year warranty covers structural defects but requires proof of correct assembly. Now, unroll that mattress and experience sleep transformed—this is why you chose Nectar.


